Tuesday, December 31, 2013

Happy 2014!!

 Happy New Year All! I hope 2014 is a healthy, happy and prosperous year for us all! I just updated my website- hope you'll have time to check it out. I am in the midst of re-programming it so that it will be more 'readable' by search engines, but it's a slow process....

You can find it here:


I also managed to get a cache of medium/large Ethiopian opals cut before the kids were home for Winter Break- half of these I recently bought, and half I've had for a while. Prices for rough were down 1/3, and even cut stones have come down in price. Not sure why.... Due to my main supplier having sold out of his opal stock, I've had to rely on other suppliers and myself! I did manage to get a few nice faceted opals at the last International Gem & Jewelry Show, and these will do nicely for those customers who prefer cabochons. Some had a lot of sand in them, but I think once the bezels are on, they'll look great. It's always a struggle figuring out how much stone to cut off, and how much sand is acceptable to leave on, in order to give the stone more weight. Myself, I don't mind much sand, for it reminds me where it came from and that it's a natural object. 

Once the kids are in school next week, I have gobs of projects to finish up- look for more good stuff here soon!!

Sunday, December 29, 2013

A Photographic Opportunity

This holiday season I had the opportunity to consign some pieces to photographer/portrait artist Leslie McIntosh in Virginia Beach. She wanted to try to market jewelry from a smattering of different artists and did several shows in her beautiful studio, with creative displays and marketing.


What's so interesting is how she photographed my pieces, above. It's always surprising to see one's work photographed by someone else. It takes you aback because of the way they 'see' your work, and the decisions they make to package it. But there are definite advantages to having a photographer market jewelry!! It's a beautiful photograph. The makeup dots above her eyebrows seems to reinforce the granulated technique of the jewelry.  It has a certain spirit, too, which I think aligns with the spirit of the pieces. As I always am taking extreme close-ups of my pieces, I do seem to want to look closer at each of the pieces, but I have to remind myself to take the image in as a whole.

What do you think??

Sunday, November 24, 2013

The Sacred & the Profane

In my world as a stone addict, there are 2 types of days: the sacred days, and the profane days.

The sacred days include: days shopping for gems.

The profane days: every other day.

However, this past weekend blurred those lines a bit. I went to the International Gem & Jewelry show at a newish location, the Gaylord Hotel & Convention Center in National Harbor, Maryland. I was going directly to my opal vendor, S&S, because I've had customers wanting faceted opal rings and S&S has the best selection. Their faceted opals are the cleanest, clearest, and brightest I've found. So what did I find? They had recently sold their ENTIRE inventory of faceted opals to a 'guy who makes jewelry for TV'.

I. Was. Crushed.

Good for them; sucks for me. AND they won't have a selection of them in stock again for months, after Tucson in Jan/Feb. AND they are not guaranteed to be the same quality as their last stash.

To top things off, my second choice for faceted opals, Best in Gems, was not even PARTICIPATING in the National Harbor show.

AAAAAARRRRRGGGGGHHHHH!

Left very unsatisfied. To top it off, I ventured into the small wholesale section looking for chain for my friend Karen, and bought it from a new vendor, only to find my tried-and-true vendor there for the first time, at better prices! OMG I broke my own rule of walking around first before I purchase!

Okay, okay, onward and upward...

Then yesterday, I took my daughters to the yearly local Gem & Mineral show at George Mason University in Fairfax VA. I did score and bought some rough opals at 1/3 the cost they were several years ago from the same vendor. That was good. Just have to cut them. So I'm hoping they'll be beautiful and my customers will 'settle' for the cabochons I cut over the faceted option.

2 years ago I bought 2 gorgeous Williamsite cabochons from a vendor there, and was hoping he'd be back with more, but he wasn't even there. Chances are his stock has completely sold, anyway.... :(  We'll see if I see him at a larger gem & mineral show in March. I'll definitely see my opal guy in March- fingers crossed he has some nice stones with him!

Oh the agony!

To top it off, I got some repeat castings back- I asked for 10 of model #1, and 6 of model #2. Wanna guess what I got?? You guessed it! 6 of the first one and 10 of the second one!

Maybe I'll make some great things this week, as well as some sales, to get my spirits back up.

Lesson learned: buy as much as you can when you see it or you may be sorry later!

Sunday, November 10, 2013

New Ring Project- Lots of Opals!

This week I made a new ring using some opals. I can't resist the lure of opals- somebody stop me!!

I laid out my stones- I liked the idea of combining a long lean, irregular blue-tinted Australian opals with these orange-hued Ethiopian opals in a row.


This ring, done a few years ago, was similar, but used big granules instead of stones.


First I made the bezel for the large opal, and used commercial bezel cups for the smaller ones- they are time-savers.


I also wanted to encorporate some granulation, because my work has been using that technique lately, and also because there needed some decorative quality!


I fluxed and placed everything, then waited for it to dry, then heated until fused!


Next I cut/trimmed the excess sheet and soldered on a shank from commercial wire I recently got that was nice and thick. Thick shanks are ideal for big or heavy rings- all the surface contact with your skin avoids the rings spinning around on your finger, which heavy rings are often guilty of...


Dunked in an oxidizer to turn it black....


Then the high points polished and stones set. Cool!!


Next week: these for earrings! I may use the same technique of granulation in between stones. Check back...

Here's a listing of the ring in my shop:


Saturday, November 2, 2013

Spinner Ring- Illustrated

I recently had posted about the 'trick' of making a spinner ring. This week I documented making one for a customer and thought I'd share. You can see the earlier post here:


First, I needed to make the inner band a size 8, so using my ring chart, and knowing I was using 22 ga. silver (which ran through the rolling mill, hence making it 23 gauge) I figured the length I needed, soldered it closed, and oxidized/buffed it to bring out the contrast of the texture. You can certainly use a thicker gauge! This is as thin as I would go, though. It's a nice lightweight band but is not flimsy or cheap. 


I actually got some of the channel wire I use to inlay the opal cabochons casted, because that is the most time-consuming part of making these spinner rings. So I use a casting and my round ring-shank pliers to start bending it into a circle.


I'd recommend making the outer ring quite tight to the inner ring. You still want it to be able to spin around, but it should be no more than 1/2 mm or so airspace between the 2 rings. This insures you don't have to flare the inner ring too much to achieve a lock-down on the outer ring. It could take some time to achieve this- be patient, do lots of measuring, and don't be afraid to take a smidgen more out and re-solder!


Test it to be sure it spins around smoothly...


Next I darken the interior of the channel because opals look best on a dark background. I use a fine black Sharpie!


Ready for opals!


I use the inner ring to hold the channel ring while I epoxy in the stones. I mix the epoxy and do half the circumference of the ring at a time. I use a toothpick to apply the epoxy- too much looks messy. Then I let it cure overnight.


Finally, I flare one end with my dapping punch, put on the outer ring, and flare the other end to match. Voila- all done!!

Want one? Here's a link:


Thursday, October 31, 2013

A Simple Ring?

This may look like a simple ring, but when I look at it, I think of eating Mexican food with my hubby.


It's actually an Australian opal- a pretty one I spent a lot of money on in Tucson, Arizona last February. My husband Bob and I went on a 6-day vacation there from northern Virginia, and it was HEAVEN. Why? First off, we got a break from our 3 school-aged children. Second, we got to spend time together, sleep in, and eat lots of Mexican food at Los Portalos. And third, I got to shop for gems!

For those of you who don't know, Tucson is the center of gem-buying for 2 weeks every year in late January/early February. Vendors from around the world come to sell their wares in every possible hotel meeting room, convention hall, or other indoor or outdoor venue. It is pure heaven for a gem-crazed nut like me. Me and 50,000 other nutty people! I had a good holiday season last year so I was able to do some investing by buying gems at great prices. Not all prices in Tucson are good- you have to hunt, and therefore, must have time and patience. Otherwise you may not find the ideal deal.

Last week I made the ring shank- it's 2 sets of 3 strands (6 total) twisted then fused to make this look like it's braided. I love it! Here's an earlier post about how to make them:
http://stoneaddictblog.blogspot.com/2013/04/twisting-wire-shanks.html
If I could make these for every ring I made, I'd be happy. That's my personality though- I get into something and it's not until I overdose on it then do I totally get sick of it and reject it until much later. There was once an episode with Cheetos that you might imagine hit me hard- I gorged on them and then didn't eat them again for years... I'm sort of doing that with this ring shank, but now that I'm older and presumably more mature, I try to hold myself back from going full-out on what I like. Moderation is key.


I chose the stone and knew it'd be challenging to set. It's a bit thin and has a wavy bottom- so I had to make sure it was sitting nicely before I folded over the bezel. I took my time and spent 30 minutes going around and around on that bezel, hammer and punch in hand, carefully moving the metal down to meet the stone. But when I look at it, I remember the show I was at, and the people I bought it from. They were a Chinese company selling only opal. Did you know that most opal rough is bought up by the Chinese, cut and re-sold in the international market? Yup, it is. At another vendor in that same show, the husband of a vendor who was bored started a conversation up with my husband, and asked my husband if he was retired yet (this gentleman was). Bob and I had a laugh later about that because he's not really close to retirement age. Was that guy suggesting Bob looked old? I giggled about that.... Oh, to be retired and travel from gem show to gem show... one can dream..... We had fun that day and I remember trying to shoo Bob away as I was paying the opal vendor so he couldn't see how much I paid for those stones!

And that gets me back to Los Portalos. Coming into Tucson the first night, we were looking for a place to stop and get dinner. Bob was driving and I was hurriedly looking on Trip Advisor or some such app to find a highly-rated Mexican place we could stop at on our way to our hotel. Los Portalos was not in a great part of town, but it was on our way and highly-rated. It was the best chili relleno I've ever had. We sampled a couple of other restaurants for dinner that trip, but went back to Los Portalos two more times. I got the chili relleno each time, and each time it was perfection. Bob got different dishes each night, but the last night was the best. What a great way to end our trip! Great Mexican food, time together, and gem-shopping.

So now whoever buys this ring, gets a ring with good karma and soul. And I get satisfaction knowing that someone will love it forever, and I invest the money into a reserve fund for a trip back to Tucson....

(Here's the link to the listing on Etsy:)
https://www.etsy.com/listing/167607540/australian-opal-gold-and-silver-braided?ref=shop_home_active

Monday, October 28, 2013

Recent Work Completed

Finally finished some things sitting on my bench for the whole week- ugh! I hate when I have no time to work, distracted by the 'small stuff' of life!

You may remember this from my last blog post- this guy was almost done- just needed to set the stone and put on the chain and clasp.


It's a pretty piece- looks better on but I don't have anyone to model for me!! I opted for a gold-filled chain to increase the mixed-metal look of the piece, which I like.  Some keum boo added to this- etching, granulation- would be nice too. I am thinking that to combine techniques makes my work stand out more as I develop my own 'look'. It's been about 8 years since I started metalsmithing and I'm just feeling like I need to develop my own look or brand. It's hard to find a niche in today's over-crowded jewelry category!!


The other problem (if it is one) is that I love using opals so much, in exclusion of other stones. Ho hum. These were going to be simple post earrings, but after surveying women and having most like the wire-type earrings, I changed my mind!


The pic's a bit blurry- sorry! I had to rush the pic because the camera was almost out of power and guess what? My daughter doesn't remember where she put the charging unit to the camera! Nice! Anyhoo... I fused the bezel cup and 3 granules onto the discs, then fused the 4 balls onto the square wire, which was then soldered onto the discs. The earwire was soldered onto the back of the square wire. I like the industrial quality they have- I think it contrasts nicely with the vaguely floral etching and the ethereal quality of the opals. 

Still have a couple of things on my bench to finish up- I hope the 'small stuff' of life doesn't keep me away from my bench this week!!

Wednesday, October 23, 2013

What's on my Bench?

I have some works-in-progress so I thought I'd do a short post to show you what I'm hoping to finish up by the end of the week!

The above pendant was first etched with a copyright-free pattern I found in one of those Dover design books (I think it was Art Nouveau but I'm not sure!) I cut out the design and smoothed the edges. I used Argentium silver, so that afterward I could put some select granules on top of the pattern to further decorate the surface. After fusing them on, I created a 22k gold bezel and fused that on as well. I'll use a gold-filled chain to complete the mixed-metal look.  So now I need to set the stone, attach the chain and figure out what to use/make for a clasp.


I also made a couple of my twisted/braided ring shanks for use in some special rings. I recently bought this yummy translucent chalcedony and am thinking it may be perfect for the job. I'm thinking about how I'm going to set it. Was considering using a gold bezel, with maybe some silver granulation on the sides, or maybe even a stone set on the side, too. Not sure....


These are recent etchings. The top pair are domed a bit, with keum-boo fold foil in the center and oxidized. The eyes are really cool, aren't they? Still trying to think of what else to do with them for earrings. Any ideas?


These small etchings will have 6mm opals in the center. They're prettier than they look here because once I blacken the background they will really be set off and firey! At first I was gonna keep it simple and just solder those bezel cups on and put a post on the back. But I recently did a survey on our Ladysmiths Jewelry Collective Facebook page, and more people actually prefer wire earrings. So, I'm thinking of a new plan.... catch me back later and see how they end up!


Sunday, October 13, 2013

The Question of Value

At the end of this month the Ladysmiths and I will be participating in a showcase 2-month show at the Northern Virginia JCC. The JCC is taking 30% of our sales, so I had to do some thinking about what to price my items at. Normally, I price as low as possible so that I can make as many sales as possible. It's a fine line, because I don't want to undersell my items, but at the same time, I don't want to price so high that it turns people off.

Many in the business of selling handmade items argue that I should set my items at their retail price. That means, if I want $150 for my item, I should set the price at $300. That allows me to wholesale my items to stores and the retail price is fixed. Of course the $150 I want for my item consists of my costs of materials, plus the cost for making it (hourly wage x number of hours to make). The problem I've had is: What should my hourly wage be?? What is the value of my skillset?? Now since I make one-of-a-kind items primarily, I don't see how the argument that someone can look at my website and see that item listed for less holds water. However, I recently started to cast some of my pieces, and list them on Etsy. Combined with the desire to start wholesaling, it does make sense to have one retail price. 


But then value is not always calculated based on materials + time to make. Many times, I price based on perceived value. I feel sometimes that is a more accurate way to price. Take the above bracelet. It is made of 18 pennies pre-1983 (100% copper). It obviously cost me $.18 to make. Hours to make- maybe 4. So the questions are: What is my hourly wage? If it's $20 an hour, do I let this go for $80? Should the cost include the cost of the hammer I used to rivet the links? Or some part of it? Some people have told me hourly wage should be many times that. What are similar things sold for? What is the perceived value? After all, not everything works via formula. Pricing is very complicated. 


Should price be based on what people are willing to pay? Some would be willing to pay $300 for one of my items, others can barely rationalize spending $100. It really depends on my target market, and also depends on how educated they are about what went into making that item.  I have taught classes to certain students who want to come in, make a few things, and say they've enjoyed the class. But what they realize is how difficult it is. Sometimes they want me to do things for them. 

The skillset I have was not learned overnight. It's hard to rationalize what salary I deserve because I am in the business of making luxury goods. Does anyone really need a penny bracelet? No, of course not. If it's a choice between food and the penny bracelet, they will choose food. But for those with some expendable income, the choice to buy art is a wise one. Items made by artists, artisans, craftspersons, whatever you want to call it, are guaranteed to enrich your life, give you pleasure, and inspire you. What is the value of that?

What do you think??

Saturday, October 5, 2013

Results from the Ladysmiths Etching Workshop

Last week the Ladysmiths, a group of local female metalsmiths, came to my house for an etching workshop. You can see a brief report here:


And above, are the earrings I made with some of my etchings!


I have been having the best luck lately using my laminator rather than an iron to stick my PNP (press and peel) paper to the metal. I like using copyright-free images and print out a whole page of images, some I use, and others up for grabs. Once printed onto PNP paper with my laser printer, I tape each image onto a sheet of silver with a small piece of tape. I used a piece of paper to 'catch' the silver sheet as it comes out of the laminator, because it is hot!! This technique does not seem to work well with smaller pieces- the piece can get stuck in the machine, and it doesn't trap and keep the heat long enough to effectively melt the toner. But large pieces of silver with a bunch of images positioned on it seemed to work great for me and for others. I put it through the laminator about 8 times or so. A good guideline is when you can see the image become higher-contrast through the back of the blue plastic.


The PNP paper transferred great and I then cover up the remainder of the silver sheet with nail polish so it won't etch. Whatever isn't covered with PNP blue paper is painted. If I was using words, I'd have to mirror image them so that when they transferred, they read the correct way. I also reverse the black and white because as you can see, whatever is black is protecting the silver from being etched, so it's always a good rule of thumb to do this. I use plastic duct tape on the back to protect it from being etched- it's more cost effective than nail polish!

I wrote an article a while back for Art Jewelry magazine on Nail Stamp Etching. It's a great way to use already-etched plates to create patterns for etching- no PNP paper.  You can read about this way of etching in this blog:


I soaked my sheet in used (blue) nitric acid for 10 minutes, checking it every so often. If you start to see PNP paper floating up from the silver- TAKE IT OUT! This can happen if the acid is too strong. I use nail polish remover for the polish and sandpaper to rub off the PNP.


I sawed out each of the flowers and annealed them a few times with my torch to bring up a layer of fine silver to the surface. This is called depletion-gilding and it's necessary with sterling silver in order to apply keum boo (fused gold) to the surface.


You can see from above that my goal was to gild the interior of each flower.


And here I'm thinking I need to add some opals!!


So I create 12 bezels and solder them onto a base sheet, then cut them out roughly. This will be for 2 pairs of earrings. I like the difference in scale between the swoop of the flower and the small gems. This is important for visual interest. A variety of colors, textures, patterns and scales keeps your eye moving and your brain reads that as dynamic. A lot better than boring!!


So after the gold is applied, I oxidize/buff each piece for a little contrast and slightly dome each piece. You can also see above I created the tops for the 7-petal flower pair. 


Above is that pair just before I set the stones. Because I oxidized the piece and it was hard to clean out the little 4mm commercial bezel cups, I used a hole punch to create little white circles of paper that sat beneath each stone. Because the citrine and iolite are transparent, the dark silver background would've dulled their color, so this seemed like a good thing to do. It certainly did brighten them up!


Here are the other pairs before I set the stones and bent the earwires.


And above are the finished pair of 7-petal flower earrings! I used citrine to pick up the gold color, and iolite because it's a great complimentary color to the yellow. They have great movement because the lower part dangles. The leaves were created by cutting out leaf-shapes, using a ball peen hammer to hammer the edges, then using a chasing tool with a sharp line to create the veins. The upper assembly was soldered onto a piece of flat wire, and then the earwire was soldered on the back side. A hole was drilled in the flat wire to receive the wire loop soldered on the back side of the flower. I like how the slight dome gives the flowers some nice dimension.


And here is the other pair. After filing and sanding the edges of the top portions, I soldered a wire on the back- the top was folded down to create the earwire, and the bottom portion was looped through the hole in the flower dangle.


I made 2 similar pairs because I'm listing one in my Etsy shop and one I'm using in the JCC show the Ladysmiths are participating later in the month. If they don't sell, maybe I'll keep a pair!


Wednesday, September 25, 2013

New Work- Gemmy Goodness

I started some new projects today-  a little different because I haven't made much since the kids were home this summer and I need to use my skills and use up some gems too (that's right- so I can buy more...)

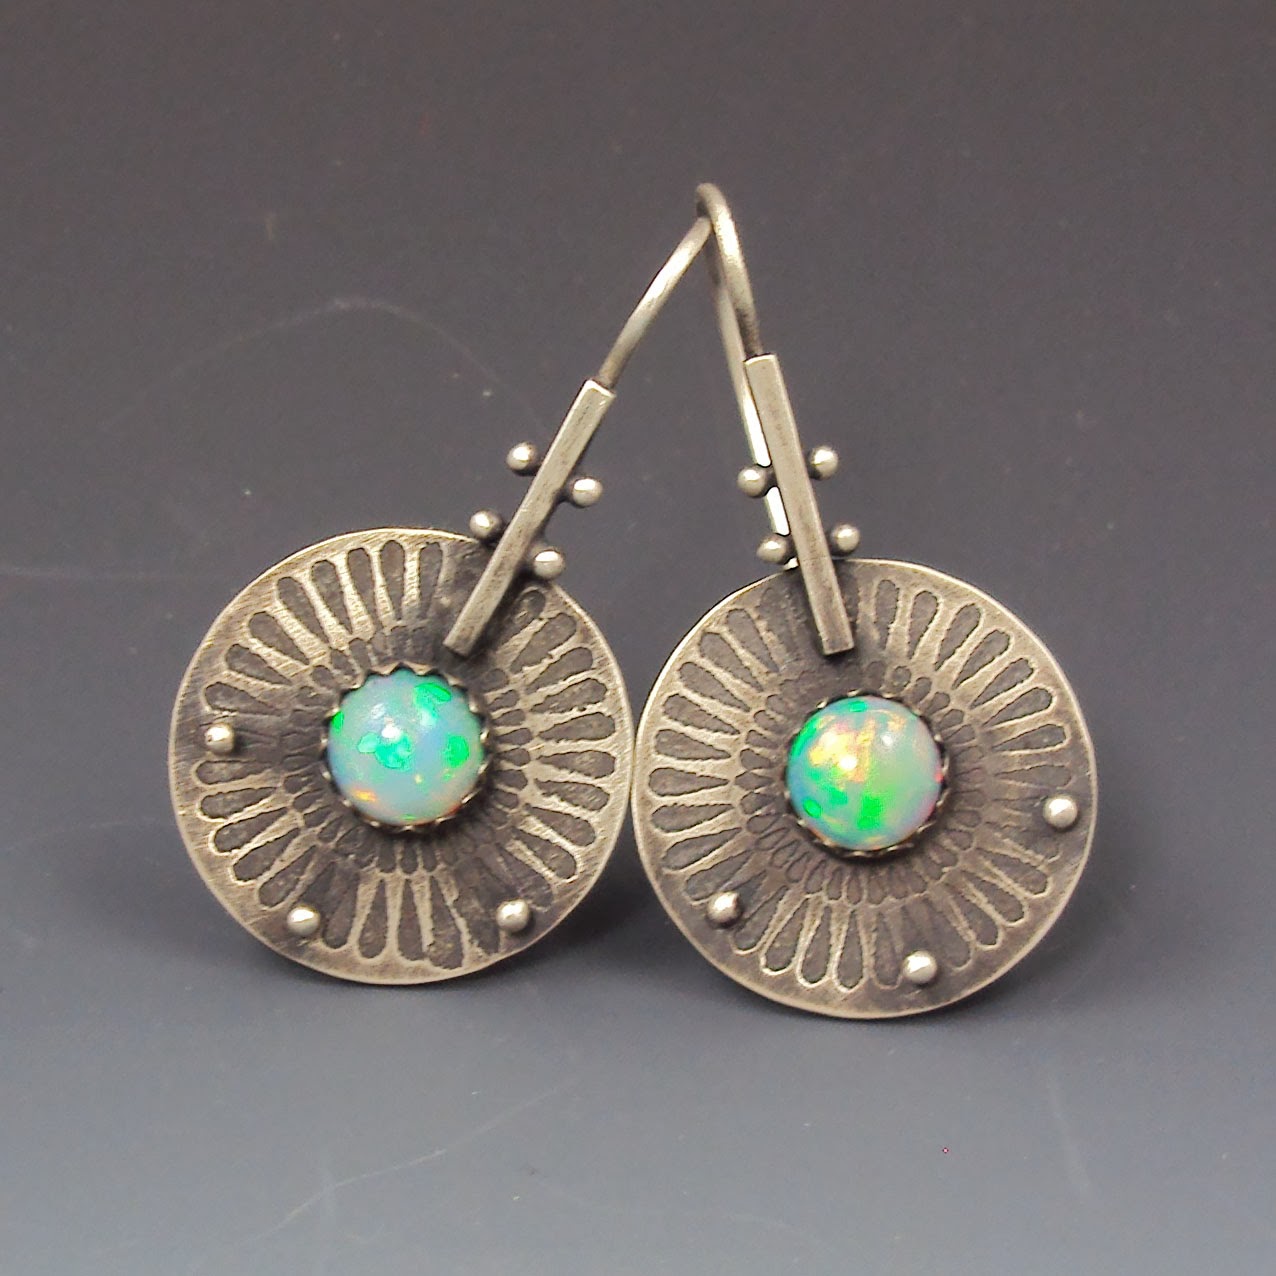
So I am thinking of clustering gems around a central contrasting gem. The top right is an opal with iolite rectangles, the middle is sugilite with carnelian rectangles, and the bottom is green quartz with rhodolite garnet squares. The top 2 will be necklaces but the bottom could be a ring- a large ring, but not too large for some people's taste. I may decide later to make it a necklace, too. I am going to set the faceted gems upside-down, because a) it's easier and I'm lazy, and b) because it looks cool.


I'm influenced by Irene Neuwirth (those are her necklaces above)- her clustering of gems is magnificent. Plus, she uses a lot of opals so I'm in love with her jewelry. She uses a lot of opal and carnelian together for contrast. Here's her Facebook page:


Of course my little projects are a lot smaller in scale than hers. But hey, I do what I can....

Irene uses prong settings for her work, but since I'm a bezel-girl, I'll stick with that. It's overwhelming for some to make SO MANY bezels, but if you use a production technique, it's not that hard. What you do need are stones that are calibrated exactly the same size. I buy in bulk, so even if some aren't exactly the right size, I can choose another until I have what I need.


I need to make bezels. A LOT of bezels. So I use some of my scalloped bezel wire. I don't use scalloped bezel wire anymore, and I need shallow bezels, so I slice the scallops off, and the bezel wire gets all curly.


Then when I straighten it out, it's not straight.


So I use my pliers to gently bend it straight as I go down the length of the wire. I do this by squeezing on the wire and rotating my pliers a wee bit. I do this every 1/2" or so.


At the bottom you can see the bezel wire before I cut it- then right above it, I actually size the wire around a typical stone (I need 22 rectangular bezels- all the same size). After it fits perfectly, I open it back up, and use that as a template to measure out the same exact length 22 times. This makes production faster.


Next I close all 22 pieces of wire, put a smidgen of solder under each joint, flux and heat until the solder flows.


Here they are pickled, rinsed and dried.


I bought a set of bezel mandrels from Stachura. These are just a few- I have 12 or more. They are helpful in forming unusually-shaped bezels. They are cone shaped but consistent in form the whole length.


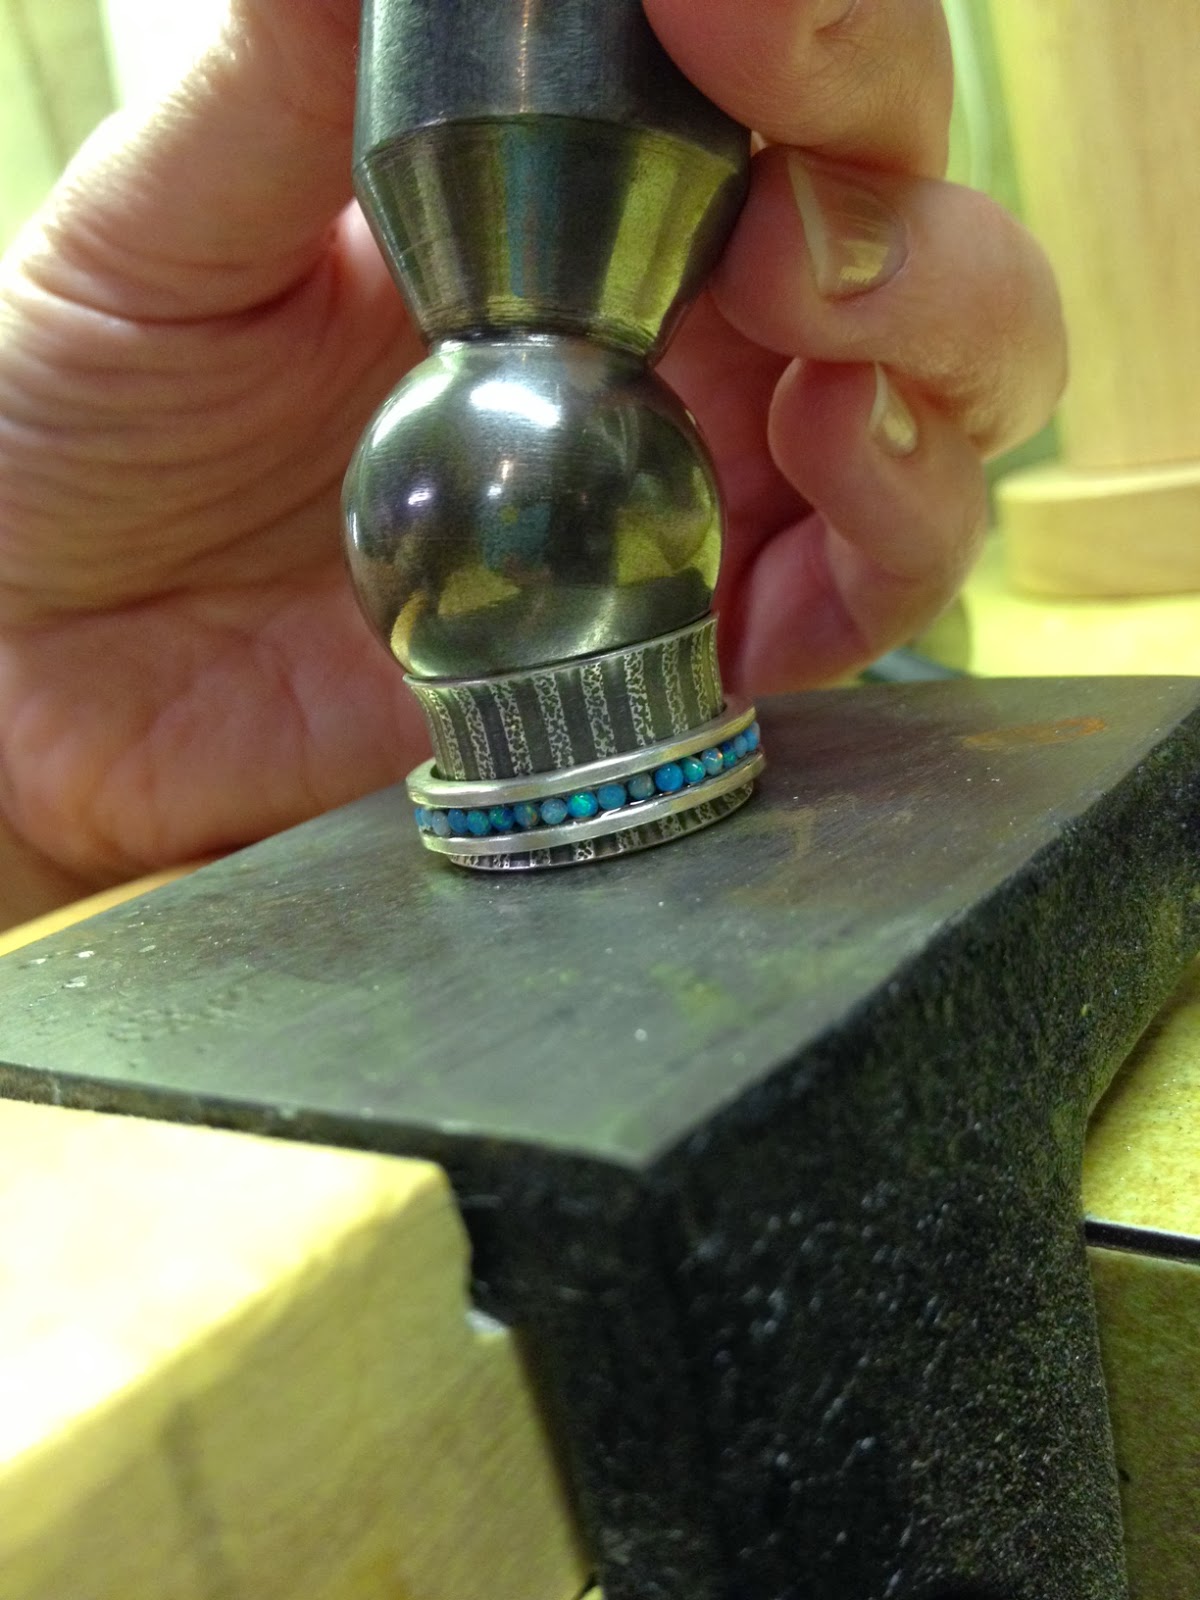
I take each soldered piece of wire and because they're fine silver, am able to use my fingers to press the sides against the sides of the mandrel, giving the wires a rough form of a rectangle.


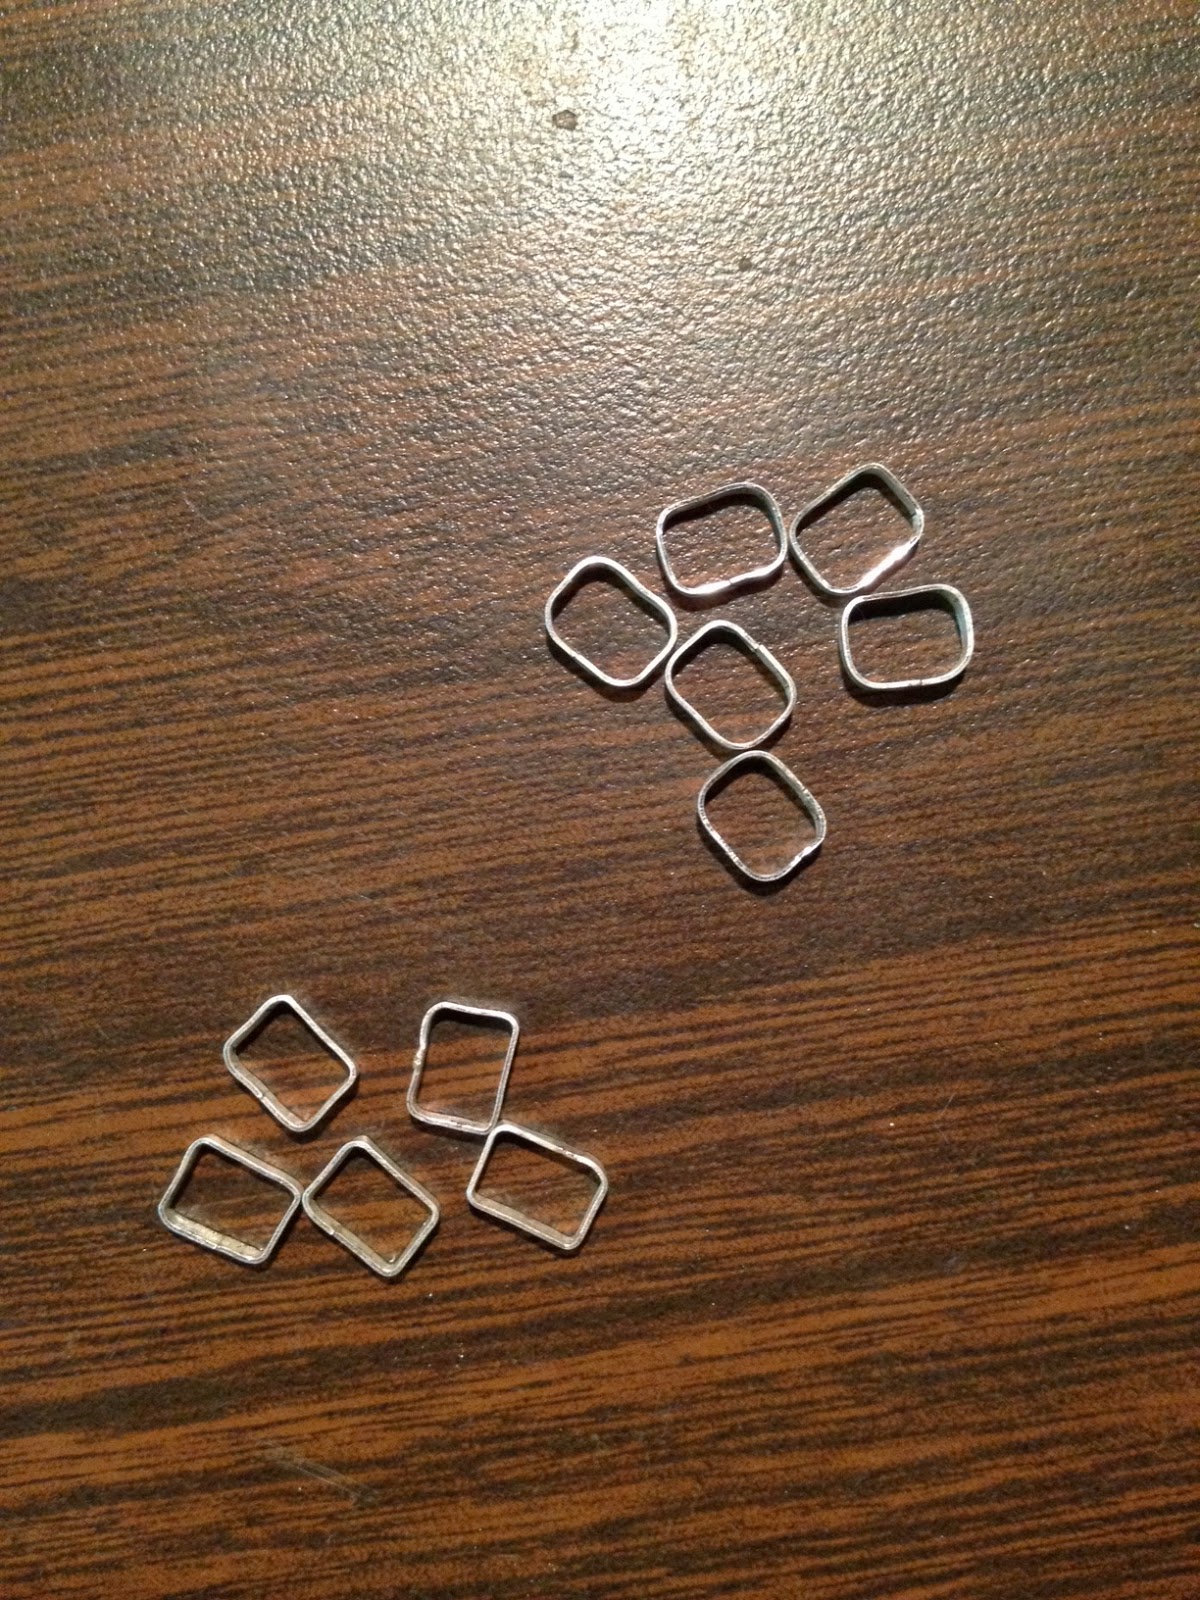
The top pieces are just off the mandrel. Then, I use my chain nose pliers to further flatten and refine the edges and corners (bottom pieces).


In the above pic I have made bezels for all the stones- 33 in all. As it was, I used less stones for the necklaces than originally laid out. I constructed the square bezels in much the same way, using the square bezel mandrel for forming. The smaller stones at the tops have pre-made bezel cups. Now I am tired of bezel-making and my kids are about to come home- done for the day!


Above, the sugilite and carnelian necklace could encorporate some granulation. Should I keep going with that on all the pieces or keep it simple?? (simple is hard for me) Also, should the bottom piece be a ring or should I make it a necklace as well? I also need to decide on what chain I will use. But enough work for today! Hopefully I will finish on Friday! Any feedback is encouraged!!