
In this post I want to show you how I rough out a slab of stone into smaller units in order to form into cabochons.

Above are various templates. Some I had leftover from my architecture days, and some I got recently. With the invention of metal clay, there opens up a new market for templates, but I like to use them for stones. I also use them for enameling- you can use them to sift a design onto your piece for firing. I also use them for designing pieces in silver- like deciding on how big a circle I want my earrings in silver. They're helpful in SO many ways. Cooltools.us makes a bunch of excellent templates, as well as Isomars.com.

Above is a slab of rhodonite that I traced out a circle on with a Sharpie permanent marker. It's nice to be able to move the template around to find a particularly beautiful section of stone. This round circle will be cut out and further cut and polished to become a cabochon.

In addition to pre-made templates, I've also had several of my own made. I found a vendor who does laser cutting, and he cut 3 sheets of shapes that I had designed in Adobe Illustrator and sent to him. I really like the clear sheets, too, because I am able to better see the slab through the template and can better decide which part of the stone I want to cut out. Many lapidaries like to freeform their stone shapes, but I find having pre-set shapes better for me. Because I have a flat lap and not a Genie-type rock polisher, I can't cut stones that have concave shapes- only convex. So, until I upgrade to a Genie, I'm a little limited in my free-form shapes.

For example, above is a slab of Sonoran Sunrise. Using my clear templates, I am able to decide where the best part of the stone is to make an exciting and picturesque cabochon from.

Here is another example using snowflake obsidian. Some lapidaries prefer to use a metal scribe to mark their stone shapes rather than a permanent marker, and this is especially handy when marking up dark stones.

Another important consideration is yield. Yield is simply the amount of stones that you can create from the piece of rough. The best yield uses the most amount of the stone and produces the least amount of waste.
Yield also is dependent on slicing the stone. The darker lines in the above picture (of agatized dinosaur bone) show where I will be slicing the stone into parts. The NE-SW line is along a fracture. The line crossing it shows the other line I will saw through. I have to allow for any crumbling that occurs with sawing, as well as the room the sawblade takes to grind through the rock. I could have marked out more lines, in order to up my yield to 6 or more stones, but the unattractive dark spot in the center dictated where I placed the current sawline. Sometimes it's better to create fewer stones that are more attractive, than more stones that are just okay. It's a balancing act. I can now look at a slab and in my mind calculate where I want to locate my cabs based on where I need to slice the slab up. Due to the curve of the sawblade, it's not practical to cut halfway through the slab and then back out- it leaves slanted and wasted parts of the rock and I prefer to just cut all the way through.
When cutting stone, one does not use a traditional sharp blade- one uses a diamond blade with a water drip. This is because using a wood-type blade will merely crack the stone. A diamond blade is not really cutting as much as grinding a path through the rock, until it's separated in two pieces. It's a fairly safe saw to use, in terms of injuring yourself by the blade. The injuries come from flying rock debris.
There are 2 types of saws typically used by lapidaries- a slab saw, and a trim saw. The slab saw I have is pictured below (courtesy of Harbor Freight):

It is a 'wet' saw which means it has a pump which shoots water onto the saw. Rocks have a lot of dust so the water controls that, as well as cooling the blade and the rock. This saw has a 10" diameter saw blade, which means it can cut approximately a 4"+ nodule of rough rock. I use it to cut slabs from rough rocks I buy. Here is a link:
Once the rock has been slabbed, typically a trim saw is used for cutting the shapes from the slabs. This typically has a 6" diameter blade. I'm currently in the market for a new trim saw, so I've been using my slab saw for all slicing! Bad girl! After I cut my preliminary sections, I then go back and try to cut any extra pieces of rock until I get close to the desired shape. The reason for this is because that way, there is less grinding to do later on my flat lap machine. Here are a couple of rocks that have just been trimmed up with my saw:

In order to get as close as possible to the outline of my cabochon shape, I actually use my blade to grind the edges by holding my stone and running it back and forth along the blade to essentially file off the edges and get the shape as close to the marker as possible. I got this idea from this online tip:
Here's a couple of pieces of ocean jasper:

The downside to using my very powerful slabbing saw as a trim saw is that sometimes there's just too much force. In the piece on the left, just trimming the shape resulted in a break along a weak part of the stone. I should have known better, because ocean jasper can be a bit brittle if hit at the wrong point. The second piece was damaged when I tried to 'file' the edges. Don't worry- both are salvageable!

Here's another look at my flat lap. I like the flat lap because I can get a very flat surface, which I would think would be more difficult with a Genie, which utilizes wheels anchored on their sides. But what do I know? Never used one! You can see from above that the post has a threaded area- this is to hold the disk onto the spinning axle- you can see the screw to the right of the picture. The white cup holds water and drips onto the spinning disk to cool the stone and prevent rock dust.

These are the diamond discs I use to grind stone- they are, from left to right, 100 grit, 180 grit, and 1200 grit. The 100 is new- haven't tried it yet. The 180 was getting worn and was not cutting as fast anymore. The lower the grit number, the larger the diamond particles and the more aggressive the cut. I use these in order. For softer stones, I start with a gentler grit and don't use the more aggressive ones. After using the 1200 wheel, the stone takes on a matte finish and is no longer frosty-looking when dry.
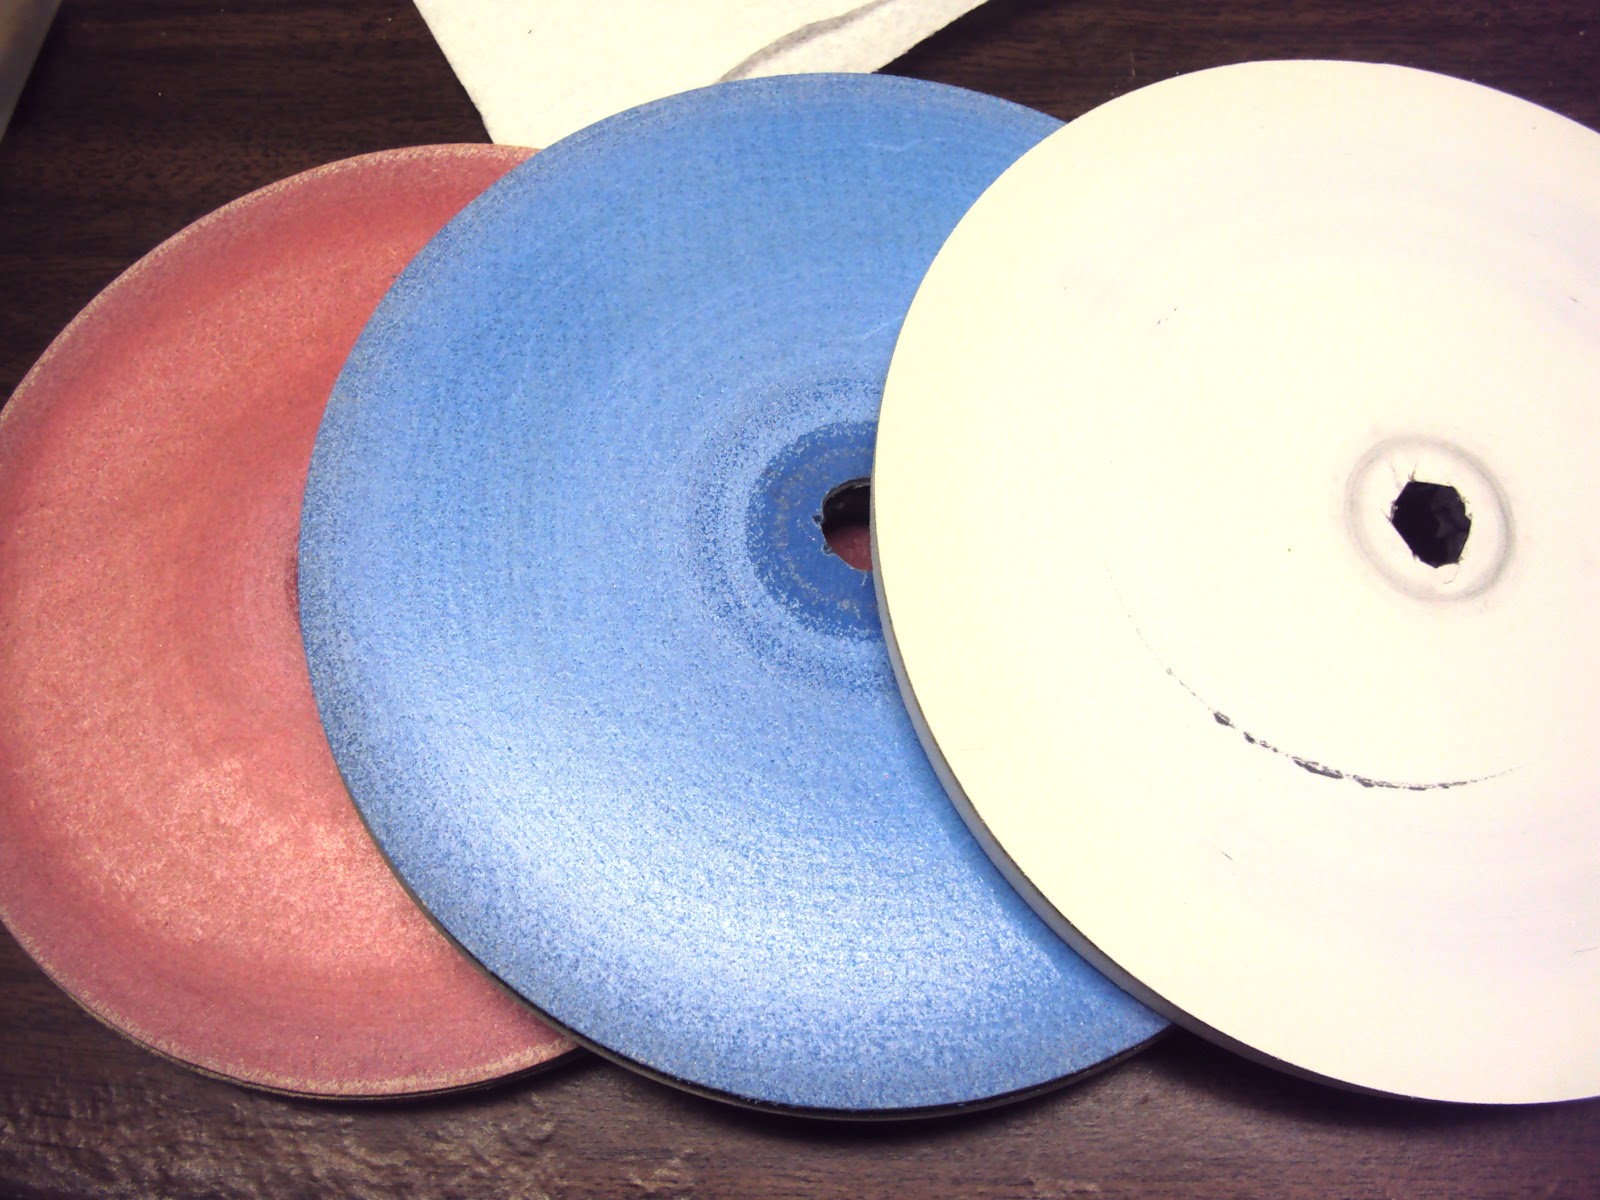
These are the next discs I use- sanding discs. They are diamond, but embedded in resin and they are not as aggressive as the metal diamond plates above them. The red disc is 600 grit, and the blue disc is 1200 grit. It may seem like I'm going backward- since I go from a 1200 grit metal diamond disc to a 600 grit sanding diamond disc, but because they are less aggressive, the numbers aren't really comparable. The white disc is a Trizact cerium oxide polishing disc.
I will go into more detail about each disc in another post!!

Here are some Sonoran Sunrise cabs that are ready for grinding into better shape.

And here is a stash of stones fresh off the slabbing saw that are ready for the next step. But that's another post....

The stone above has been cut out from it's slab, and the edges have been ground using the diamond discs, and then the red sanding disc. The back has also been finished up to the red sanding disc. This is typically the most I will polish the sides and back of a stone. This treatment leaves a nice low-sheen on the stone. I also slightly bevel the bottom edge of the stone. At this point, I will dop the stone- which means I use hot wax to attach a wood 'handle' to the stone to make it easier to hold. And then it's on to grinding and polishing the top- the exciting part!!
So you can see how much work goes into preparing a stone just to be dopped. I will show you the process of dopping in another post. I'll also post on how I go about grinding and polishing the tops of my stones. Stay tuned!!
LOVE LOVE LOVE IT!! I've been a novice prospector/miner for about 5yrs now..Have been on Mount Antero in Colorado, as well as Lake George CO. and NC gold prospecting and Herkimer Diamonds in NY ... I'm very artistc and will be equiping myself very soon with a flap lap, even if I have to build one. Thanks for having a great blog... It inspires
ReplyDeleteThat's awesome!!!! Good luck!
ReplyDeleteI would like to send pictures, just for to look at. How do I do that?
ReplyDelete