Tuesday, November 6, 2012

Sale in my Etsy Shop

Well, Obama is in for another 4 years. Whether you're happy, or drowning your sorrows, the news is: I just lowered most of my prices in my etsy shop!! Come celebrate victory or drown your sadness and buy yourself or someone you love something new!!


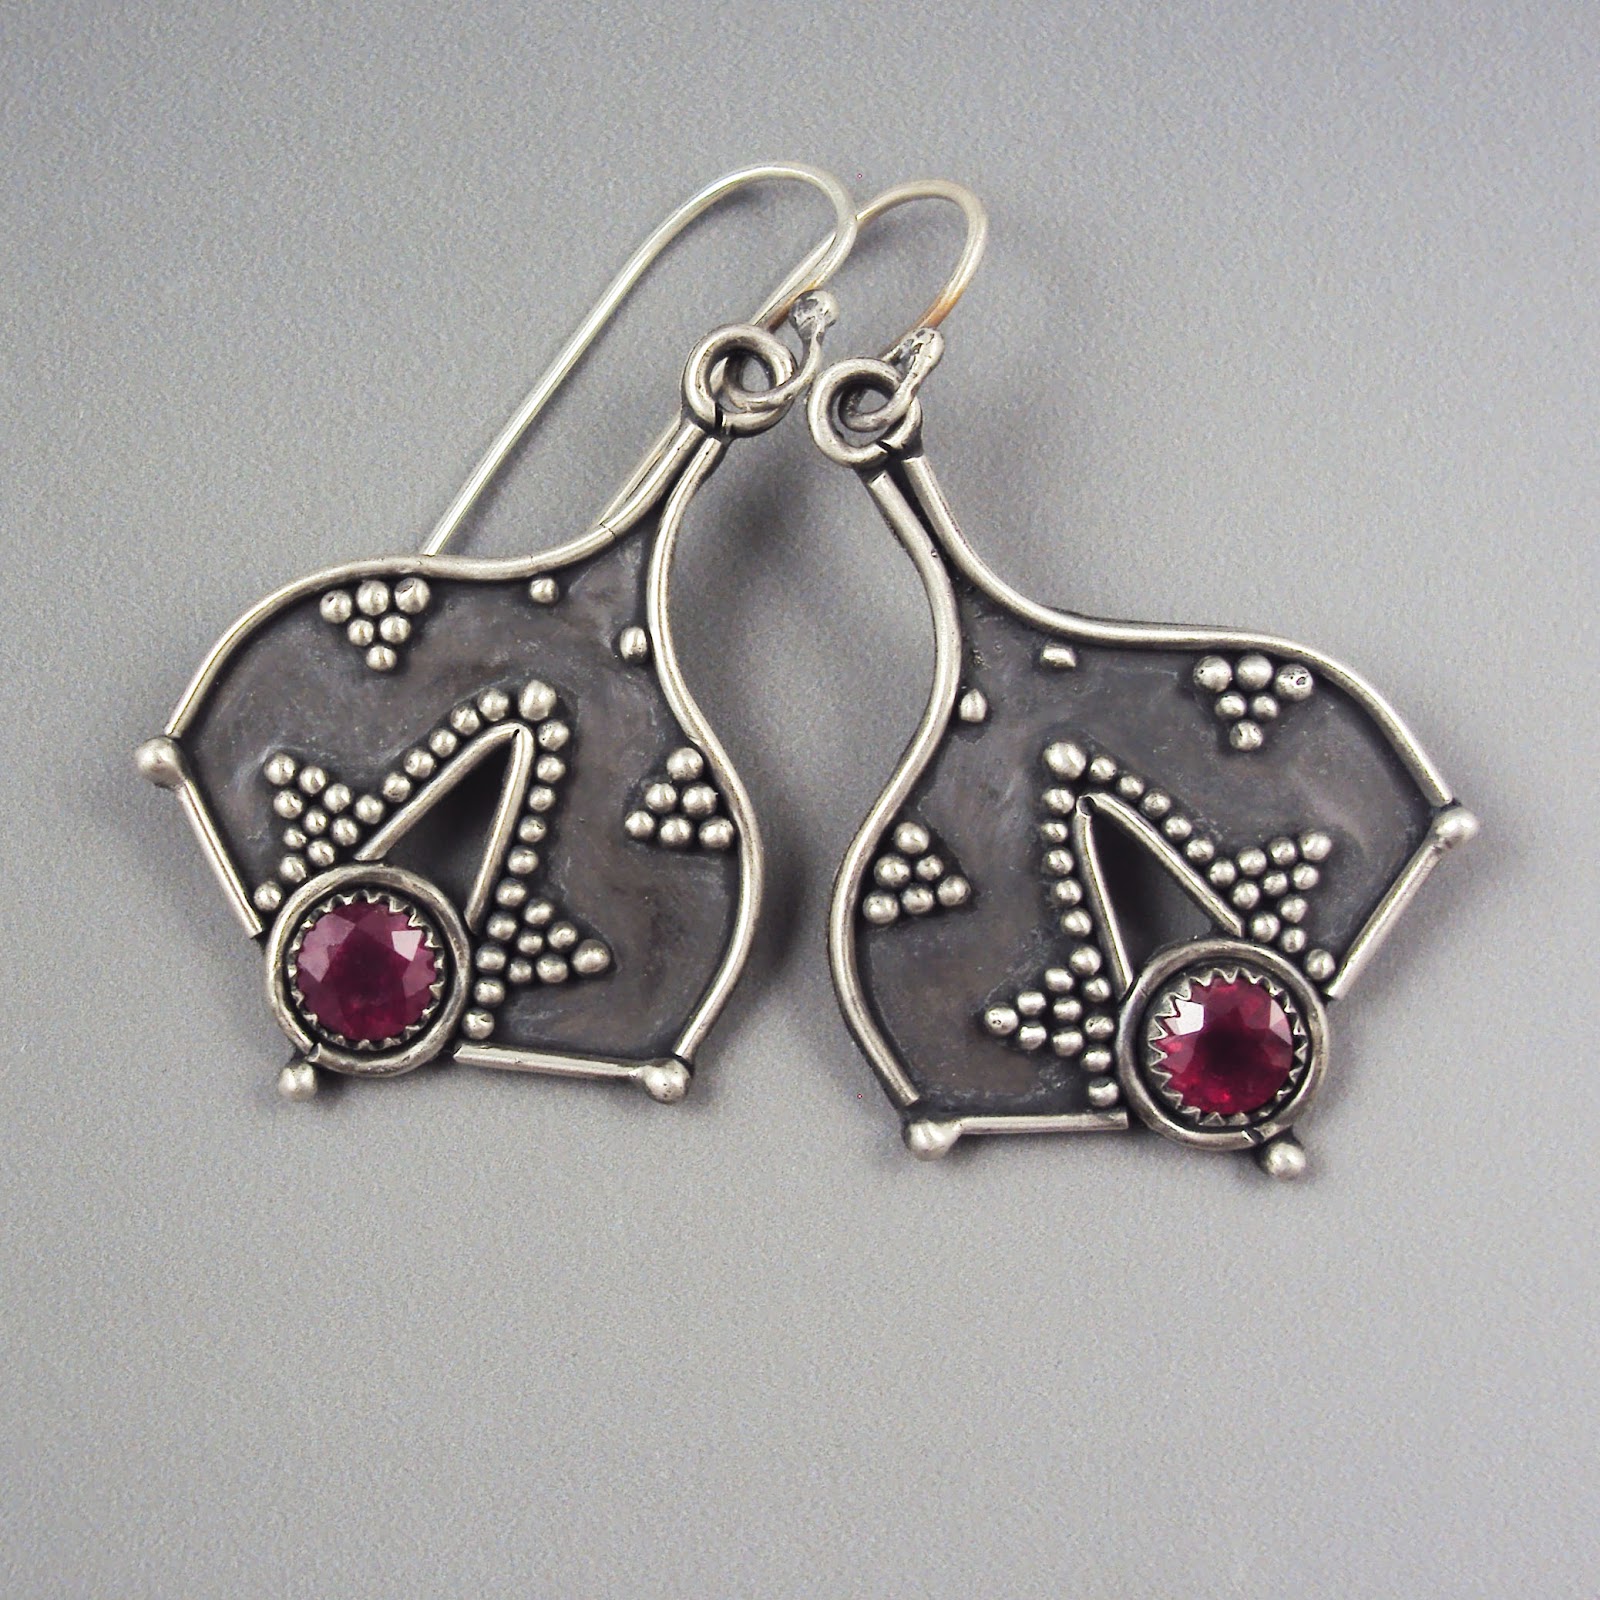
Here's a new piece I completed today- marked down to $125. A very good value for a piece of handmade artisan silver earrings. 1" wide, they have an exotic vibe and are made from Argentium silver.


Here are some progress pics:

Doing some planning....


Laying out the pieces on sheet and letting the flux dry overnight...


Pieces fused, trimmed and ready for darkening, finishing and stone-setting.


Friday, November 2, 2012

Stages of Shape & Polish

In a prior post, I talked briefly about the series of discs I use to grind and polish stones. Today I'll show you how the stones look in between each disc usage:
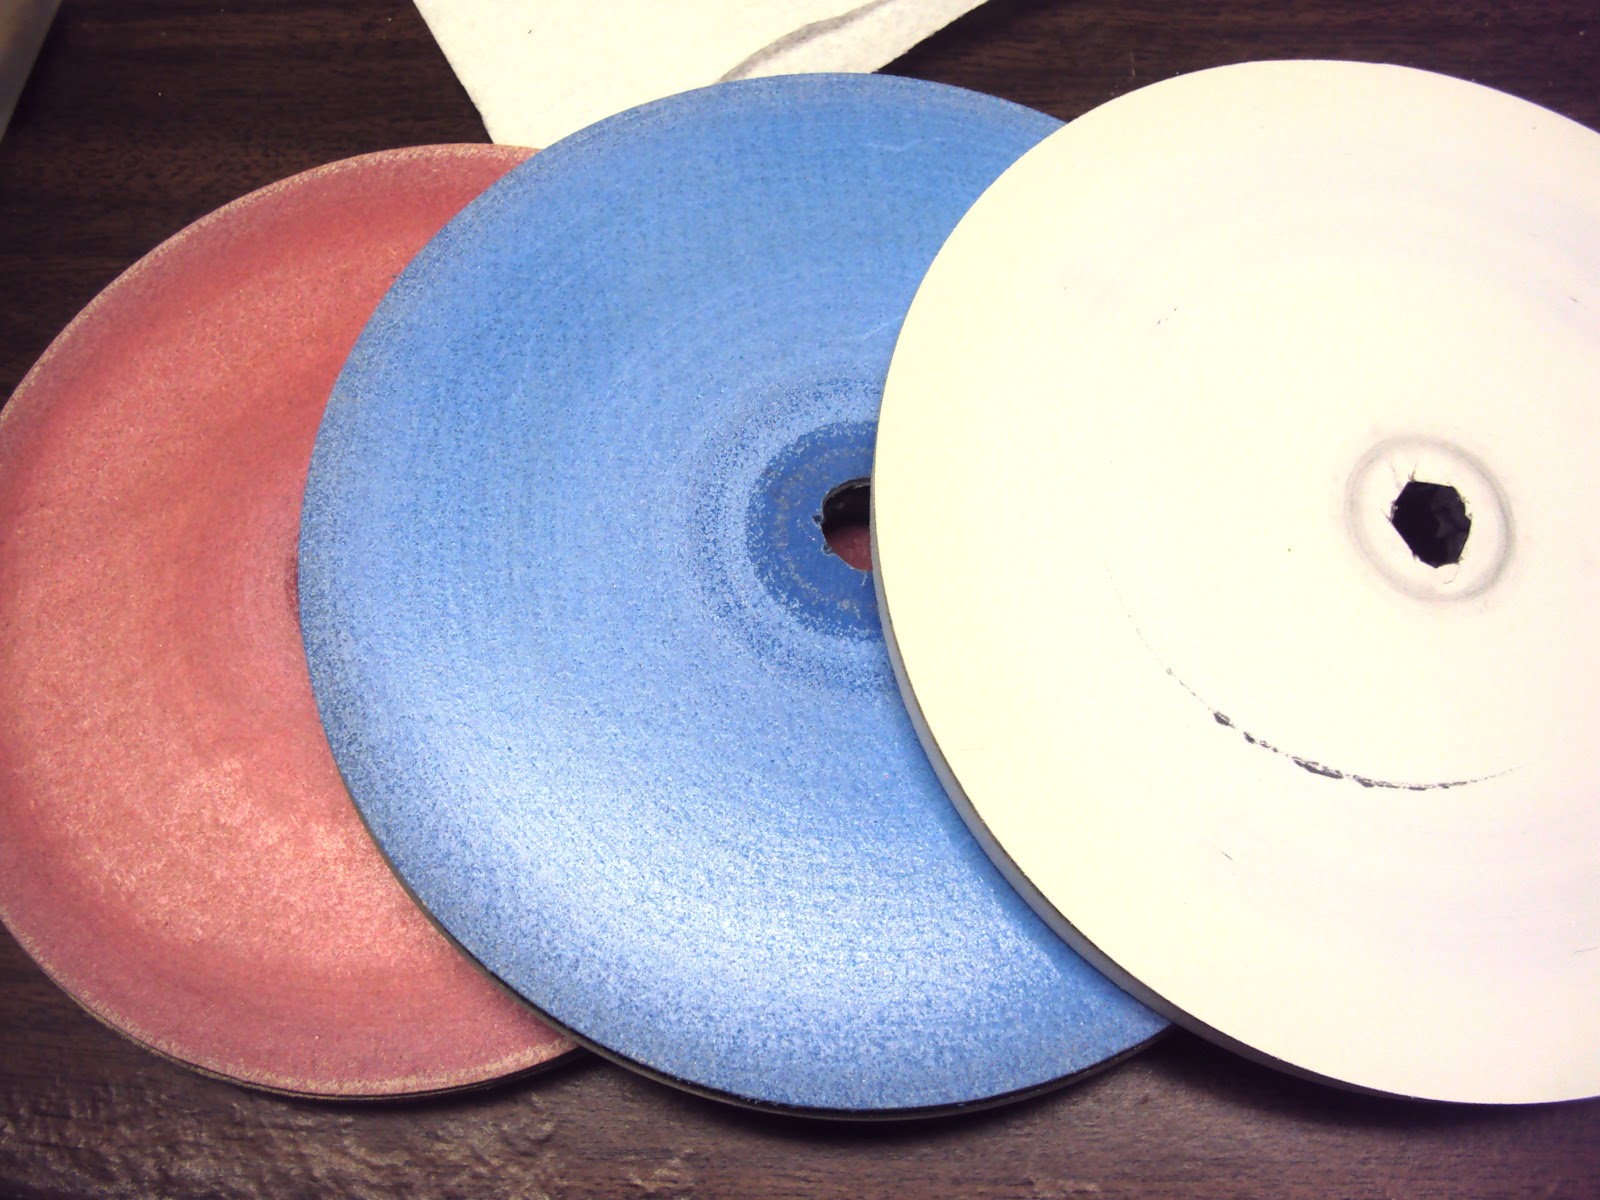
These are the diamond discs I use to grind stone- they are, from left to right, 100 grit, 180 grit, and 1200 grit. The 100 is new- hadn't tried it before today. The 180 was getting worn and was not cutting as fast anymore. The lower the grit number, the larger the diamond particles and the more aggressive the cut. I use these in order. For softer stones, I start with a gentler grit and don't use the more aggressive ones. Today I polished a bunch of stones and used only the 100 and 1200 grit- I skipped the 180 grit.


These are the next discs I use- sanding discs. They are diamond, but embedded in resin and they are not as aggressive as the metal diamond plates above them. The red disc is 600 grit, and the blue disc is 1200 grit. It may seem like I'm going backward- since I go from a 1200 grit metal diamond disc to a 600 grit sanding diamond disc, but because they are less aggressive, the numbers aren't really comparable. The white disc is a Trizact cerium oxide polishing disc.

Now let's see below what the stone looks like after each disc:


Here are the stones, cut from slab into rectangular shapes. I sanded the bottom and sides through the red disc above, then dopped the stones and started out by doming the tops into a more cabochon-like shape. 


Here they are after the 100 diamond disc; the tops have been domed. They are quite roughed up and very frosty-looking.


I went right to the 1200 diamond disc next and here they are after refining the tops. Not frosty anymore, and a very flat finish.


This is the result after using the red sanding disc- a nice satin finish. Sometimes it's nice to stop here on certain stones- like lapis or turquoise- whenever you want a less shiny finish.


After the blue sanding disc, they look shiny and well-finished.


But that extra step with the cerium oxide disc makes a big difference in the shininess and makes the color richer and more saturated.

Wednesday, October 31, 2012

Step By Step Earring Project

 This is a pair of earrings I spent most of today and some of yesterday making- thought I'd share the step-by-step just so you can see all the steps that go into making an 'artisan' pair of earrings.


I had a general idea yesterday what stones I wanted to use, and generally what I wanted the earrings to look like. I wanted to use the combination of 4 little Australian opals, about 6mm each, with 2 hand-cut Montana agates. I love the combination of those 2 stones. The earthy and  the ethereal. So yesterday I made all the bezels out of serrated fine silver bezel from Rio Grande. For earrings, I don't always like to use thick-walled bezels because it adds weight, and earrings should be kept light. I love the serrated bezels because of the nice edge detail they provide.

I wasn't happy with my first idea, so I sketched out an abstract leaf idea I had- with each opal contained in a leaf, which I thought would turn out really nice, and it also encorporated some leaf design wire I'd been meaning to use for a while... Happy with the sketch, I started creating some paper templates...


I traced out the Montana agate and created a larger-than-needed pattern- I planned to trim the sheet after I had done some granulation. The leaf or teardrop shape took some trial and error to get a size/shape I liked. Then everything was traced onto 22 ga. argentium silver.


I used a Sharpie to trace and then cut out the pieces with my jeweler's saw. I often will use 24 ga. for earrings to cut down on weight, but 22 ga. is visually a nicer weight, especially for pieces that have exposed edges.


Next I used diluted (50/50) flux to attach my pre-made bezels and granulation pattern onto the elements. When designing a piece of jewelry, it's really important to visually think through each step, so the piece comes together as expected. I waited for the flux to dry completely then applied heat until the granules and bezels fused to the sheet below.


Here are the pieces granulated- only took one time and everything stuck! Yay! Next I cut out holes behind each of the opals and also the agates. Transparent stones look best with an open back, so I leave enough lip for the stones to sit on. Plus, it reduces the weight of the earrings by removing as much material as possible. I also trimmed around the bottom elements and filed and sanded the edges.


At this stage I am using solder to attach the leaf design wire to the middle stem, as well as the 2 leaf shapes to each side. Here it is fluxed and ready to heat up. I used spare pieces of silver to lift up the ends of the leaf elements so they'd lay flat when soldered.


I then soldered earwires to the back of each, and used a satin wheel to clean them up a bit. 


I usually prefer my pieces that have any texture to them oxidized. Compare this photo to the one above it- and you can see the pattern better when the piece is blackened, and then the high points buffed off and shined up. It also takes on an antique or aged appearance which I like.


As luck would have it, a couple of balls did fall off from the bottom triangle of granulation while I was doing some buffing/polishing. Dang! I usually use a low-temperature solder (called Tix) to re-attach any wayward granules. I can even use it with stones nearby, because it melts at only 400 some degrees. Nice. Way better than 1600 degrees, which would have destroyed my solder bonds. And the color is a decent match to the silver. AND it's way better than epoxy and more durable too.


And here are the finished pair. The last step was folding over the earwire and hammering the bend slightly to harden it in order to keep it's shape. I also cut and filed the end of the wire. I was happy with them. Might be tempted to keep them for myself, too....


Thursday, October 18, 2012

Dopping Stones

 Polishing rocks could be a daunting task if it weren't for the ability to mount the small rock onto a larger handle. This helps enormously to prevent grinding down your fingers as you attempt to turn and sculpt your stone into a masterpiece. Once I noticed my grinding wheel with red on it and quickly realized that my thumb had been ground down and that was MY blood, not the stone's. Ouch. It also provides a more secure hold on that little bugger, preventing the polishing wheel from grabbing the stone out of your hand and flinging it across the room. (Not that that's ever happened to me..... today, anyway) Lastly, it allows you the freedom to turn and sculpt the stone more effectively.


There are many different ways to dop a stone- some use shellac, some use superglue. Some, such as I, use green dopping wax. I got the above dopping station from Kingsley North. They provide me with much of my equipment and tools (http://www.kingsleynorth.com) and their customer service is top notch. This dopping station simply plugs in and the copper pot heats up the wax. In addition, there's room on top to place rocks- more on that in a minute....


The above pic shows my dopping sticks- these are wood dowels that I've cut into approximately 6" lengths to house the wax. Some use metal dops, and there are other materials available, but these are cheap and easy for my purposes. The smallest stones can be dopped on a strong piece of steel wire, but honestly, I don't work that small!


My dop sticks range from about 3/16" to 5/8" in diameter, but really I have a good range of sizes just in case I need them. The important thing to remember is that the diameter needs to support the size of the stone. I like my dops to be about half the diameter of the stone being set.

Before I even dop the stones, I do a lot of work preparing them: first, I grind down the bottom to flat and grind the sides into whatever shape I need/want. I make sure I have enough vertical stone surface on the sides- minimum of 1/8"- and then I make sure the sides all meet up nicely. Next, I use 2 more wheels to grind, refine and polish to a matte sheen the bottom and sides of the stone. I also always put a slight bevel on the bottom of the stone for ease in setting. Now I'm ready to plug in the dopping station!


Above is the dopping station heated up most of the way, with 3 sticks 'soaking' and 3 stones heating up. It's really important to heat the stones up, or the dopping wax will not stick to them. I've heated up all kind of rocks and never had a problem- even opals and turquoise. Soaking the sticks helps to melt the dopping wax that was melted on there before.


I also like to mix up the wax in order to evenly distribute the heat. Plus, it's fun.


Once it's nice and melty, put a thick coating of wax on the stick, with enough so that the wax has the ability to sink down to the bottom of the stick and flow a bit to cover the stone. This will come with experience. Don't wait too long to stick it to the stone, or it will cool too much and not stick. 


Your goal is to keep your fingers wet, but not too wet- so that you can form the hot wax to the base of the stone. I tend to use my tongue juice (aka spit) but you can also dip your fingers into a cup of water. If your fingers are too dry, the wax will stick to your skin and you will say ouch, or words that express that. You don't want your fingers dripping with water, though, so be conservative.


Once cooled a bit, the wax will cease to flow and will keep its shape. Your goal is to match the outline of the stone with wax; in a sense, you are creating a buttressed structure of wax that gradually tapers down from the stone to the wood dowel. This helps to reduce stress on the stone as you push, grind and polish it. You want it to be fully supported or the stone may crack or come off the dop while you are working.


Here are the 3 stones dopped and hanging out, cooling. I cool them upside down, and if in forming the wax, some drips down the sides a bit, it's okay as long as it's not more than about 1/8" down, which is where my bezel wall will meet the curved part of the stone. If it covers up any more of the side of the stone, it will make forming the top of the stone difficult until it is removed. With hot flowing wax, it can be a challenge to control it when all that is between you and a burn is spit. Flow happens!

So now you are ready to rock and roll!

IF, by chance (of course), your rock should go flying off the dop, don't despair. Of course you have your safety goggles on and you are protected! Yesterday I polished 8 rocks and one popped off the dop at the last polishing step. It happens with all that pushing, forcing and grinding. 

What you will be left with is a nice flat surface on your dop that closely matches the outer shape of your stone. Dry off the dop and the stone completely. 


What I've found to be successful is to cover the flat dop surface with 2 layers of red double-sided tape. I simply fold down the areas of tape that run off the edge of the dop surface. This provides a nice cushiony surface, and your stone will very much enjoy sitting on it's new perch. Pushing down and completing your polishing will reinforce the bond. Of course, the use of water when grinding/polishing will serve to weaken the bond eventually, but hopefully you'll be pretty much done before the stone starts slipping around on the tape. It's a pretty decent fix for losing a stone off the dopping wax.


I like the red liner tape because it's got some thickness to it; some sponginess is good and creates a better bond.

Getting the stones off the sticky tape is just a matter of firm pulling up- make sure you don't stress a thin area of stone while you're pulling up on it, or it may crack.

To remove the stones from the wax dops, put them in the freezer for 5 minutes. The wax by then will contract and the stones will pull right off. The freezer won't damage the stones. I once forgot about some dops in the freezer for about 3 months, and the stones came out unscathed!


Friday, September 7, 2012

Viking Knit Chain

To look at a Viking Knit chain is to see something seemingly complicated, but really, it is a series of easy peasy steps. The hardest, unfortunately, is starting. Many give up on Viking Knit because they can't get a good start, but trust me, if you can live with chaos at the start of your creation, it can easily become your favorite TV-watching activity, maybe even more than knitting. This is not a thorough tutorial; rather, it is for the student who has tried it before and failed. I implore you- try it again!! Buy some cheapo wire to start with, then once you get the hang of it, switch to fine silver, 24 or 26 gauge. You'll surprise yourself.


Look at the above Viking Knit chains. You'll probably see some variety. There are lots of variables to making one- many choices to be made:

a) gauge of wire
b) number of loops around mandrel
c) number of rows to weave wire through

You can see in the above pic, the chain running North-South on the left side- that is a knit chain that hasn't yet been pulled through a drawplate. The drawplate has a series of holes, ever increasing diameter, in which the chain is pulled and the diameter reduced, thereby eliminating the horizontal lines visible in the chain. It's easy to make one with a bit of spare wood, drilled with holes 1/8" to 3/8" in diameter. Chamfering the sides of the holes at the entry point will help, too.  When the 'splines' of the chain meet, with no horizontals visible- then you've done it. You can see from the other chains above that you see no horizontal spans of wire- just v-shaped splines. Some are more dense than others- this has to do with the b) and c) variables- the more, the denser. 

I would stick with 24 or 26 ga. of wire. Want to do a quick chain- choose the larger-diameter 24 gauge. Want a finer and possibly denser chain? Choose 26 gauge. Anything thinner will drive you crazy. Any thicker- hard to work with. Number of loops around mandrel? To start, at least 4 but more than 6 is difficult.  4 will look more boxy or square, 5 and 6 more of a rounded chain. Number of rows to weave wire through? Well,  your choices are 1, 2 or 3. If you look at the above pic, the shortest piece of wire- in the center- u-shaped and copper colored- starts from the right side open and lacy- that's 1 row. Then it increases to 2 and finally a short segment of 3. This really is about density. To achieve this, you thread your wire through the crossing of wires not directly above, but the 2nd or 3rd row above, depending on desired density. Try it a few times and you'll start to see increased density in your chain.


This above diagram is one I created when I was teaching Viking Knit. I also have a left-handed diagram- email me at danaevans68@verizon.net if you'd like one! 

There are many options for mandrels- when I learned my teacher created L-shaped mandrels out of steel bar stock. I also tried wood. What I found works best, are knitting needles. I cut them (with my jeweler's saw, but a separating disk or hacksaw may work too) about 6" long, then cut a notch about 1" down from the top. The beauty of knitting needles is they are inexpensive, come in lots of diameters, and are lightweight. The notch just needs to be a gap in the surface- about 1/8" to 1/4" wide- this is necessary in order to weave your wire end through the existing chain- always work over the notch! It will give you room to work. So, as you find, you'll always be turning your work in order to always be threading wire over the notch. A rule of thumb is- pick a diameter mandrel that you want your end chain's diameter to match. The chain will always be larger than the mandrel until it is drawn through the drawplate- then it's diameter is reduced.

There are lots of ways to start a chain- the above wrapping, creating a loop down, wrapping to secure, and repeating until the desired loops are created, has worked for me. You can google other techniques. I also start with a cheap, junk wire before switching to silver, because I usually cut off the front 'messy' end anyway. 

Another difficult thing to do is to splice a new piece of wire into the existing length- I usually use 3' sections of wire, and I sort of twist the 2 ends of wire together, about 1/4" long each, continue to do a few loops, then trim once the new wire section is established. This splicing can occur a number of ways- you may find a way that works better for you.

Finally, trim the ends, use a heavier gauge wire and create a 1/4" long bend or 'hook' at the end of the wire (say, 6" long) and grab the end of the chain a few rows down and thread the other end of the wire through an end cap with a hole on the end. Make sure the end cap covers the hook completely. Make a loop to attach to your lobster clasp or toggle, and repeat on the other side with the appropriate finding.

The lesson is: don't be scared to experiment, fail, and make a mess- eventually you'll get it!! Once you do some, you'll notice that the chain will look messy, but pulling it through the drawplate will 'clean it up' quite a bit. Also, you'll start to notice intricacies in keeping the spacing equidistant between loops and will figure out how to achieve that. You'll also have to keep the force you're using to pull the wire into a loop tight, but not too tight. I find I use broad strokes of my arm when I'm threading and pulling wire. It's almost calligraphic-looking and helps to avoid kinking or overly-bending/stressing the wire.

Good luck!!

Saturday, August 25, 2012

Gem Grades

Recently a friend showed me some stones that were in nice little gem jars and had an official-looking 'Certificate of Authenticity' accompanying them. They happened to be rubies, about 7-9 carats each, and they were appraised on the 'certificate' for over $1000. They had been given to her from a family member, passed down, and were certainly NOT worth anywhere close to that amount. 

It got me thinking, that just because a gem is called a 'ruby', or 'emerald', 'sapphire' or even diamond for that matter, doesn't mean it has unlimited value. Most of you out there who are jewelry-makers already know this stuff, but the average person probably doesn't, and it's up to us to let them know the truth before they get swindled. (Or at least, before they think they're sitting on a gold mine of precious gems....)

So for you average person out there, who loves gems but doesn't know much beyond that, let me tell you, there are various factors used in the industry to 'grade' gemstones. Most of us know all about the diamond rating system, but colored gemstones also have categories of grading.

You may have a ruby, but you may not have a gem-quality ruby.

So let's go through some of the factors, using the pics below of my current ruby stock (question: what is the most valuable stone below and how much is it worth? answer at end of post)

Also, take a look at the GIA (Gemological Institute of America) website for more information about stones:

Here's a collection of rubies- the small faceted ones on the right are 4mm round and the faceted ones on the left about 7mm round. That should give you some idea of size. That leads us into our first category- size. Obviously, a larger gem is more valuable and rare than a smaller one. That said, not everyone wants a 25-carat ruby on their finger. Each person has individual tastes and for some, bigger is not better. Still, generally a larger sized stone will be worth more than a smaller stone per carat. So, does this mean the large rectangular stone is worth the most?

The next category is color. This includes hue (red, green, blue, etc...), saturation and tone (light to dark). In general, rich bright colors rate a higher price. So, for some, a deep dark amethyst is the cat's meow. But for others, they don't like the darker purples; they like the lighter purple. Again, some allowance for personal preference here. But if you look at the above stones, do you see some that are brighter and more color-saturated than the rest?


The next category is clarity. This is basically the same as inclusions. The clearer a stone is, with the least visible inclusions in the stone, the more valuable it is. In the above pic, which stone(s) fits that definition? Did you know that emeralds are almost never free of inclusions? They and tourmalines fit the category of stones nearly never inclusion-free. There are, of course, some stones that are almost always inclusion-free: aquamarine and smoky quartz to name a couple. Then there are a bunch of stones in the middle- often having inclusions, like peridot, garnet and iolite. So, if you see an emerald that looks 'too perfect' with amazing bright color  but no visible inclusions, it's either got to be priced astronomically high, or it's not real (read: lab-created). Good to know!

The final category is cut. Cabochons (the bottom stones in the above pic) are usually worth less than faceted stones, simply because they don't take as long and require less skill to cut. Opals may be the exception to this rule. That said, there are many stones that are poorly cut- not symmetrical, with scratches, poor polish, and facet junctions not meeting up. This is a hard category to judge for the average person. It takes looking at a lot of stones to judge this one.


So, giving what you now know about stones now, take a stab at which of the above stones are worth the most??

answer: the pair at the left

Why? Well, the rectangular stone is the largest, that's true, but it's so full of inclusions that it's opaque. There's no transparency. It's a nice color, but not as rich and color-saturated as the pair on the left. They're also faceted, which adds to the value. And the cut is good- they're nice and deep, while the faceted stones to the right are quite flat in comparison, and the color is not as rich.

So, for these 7mm round faceted rubies, what's the cost? Well, they cost me $28 for the pair. Not as much as you thought, eh? Well, that's because there's a whole lot more quality available than this in a ruby. Sorry I don't have a really expensive one to show you :( Maybe someday.... The prettiest rubies I've ever seen are a lot more transparent and bright red than these.

If you want to see more stones and prices, simply do a search on Ebay and you can see a multitude of gem grades and prices. Of course, the best place to buy gems is from a reputable gem dealer. If something seems too good to be true, it probably is. Many gems today are artificially colored or treated. Or not even real. But that's a whole different post....

Sunday, August 5, 2012

Metal Clay Class with Wanaree Tanner

This weekend I was lucky enough to take a class given by Wanaree Tanner, who does AMAZING things with metal clay! Check out her website:


And here's her blog:


Wanaree is a full-time artist, super-nice, funny and down-to-earth lovely young woman. And best of all, it was located only minutes away from my home in Springfield, VA at La Ruche Davis Studio!  What's better than to spend the weekend chatting, creating, and eating snacks with a group of like-minded creative women artists? Here's the link if you ever want to take classes there (host Ann Davis is awesome!):


Wanaree has perfected the use of using a cutting machine, in this case the Silhouette Cameo, to cut metal clay bezels and more. In this class we learned how to do this by constructing a stone pendant with a bezel she custom cut for us made from COPPRClay.  Can't wait to try more of it on my own!  Here is the machine below:


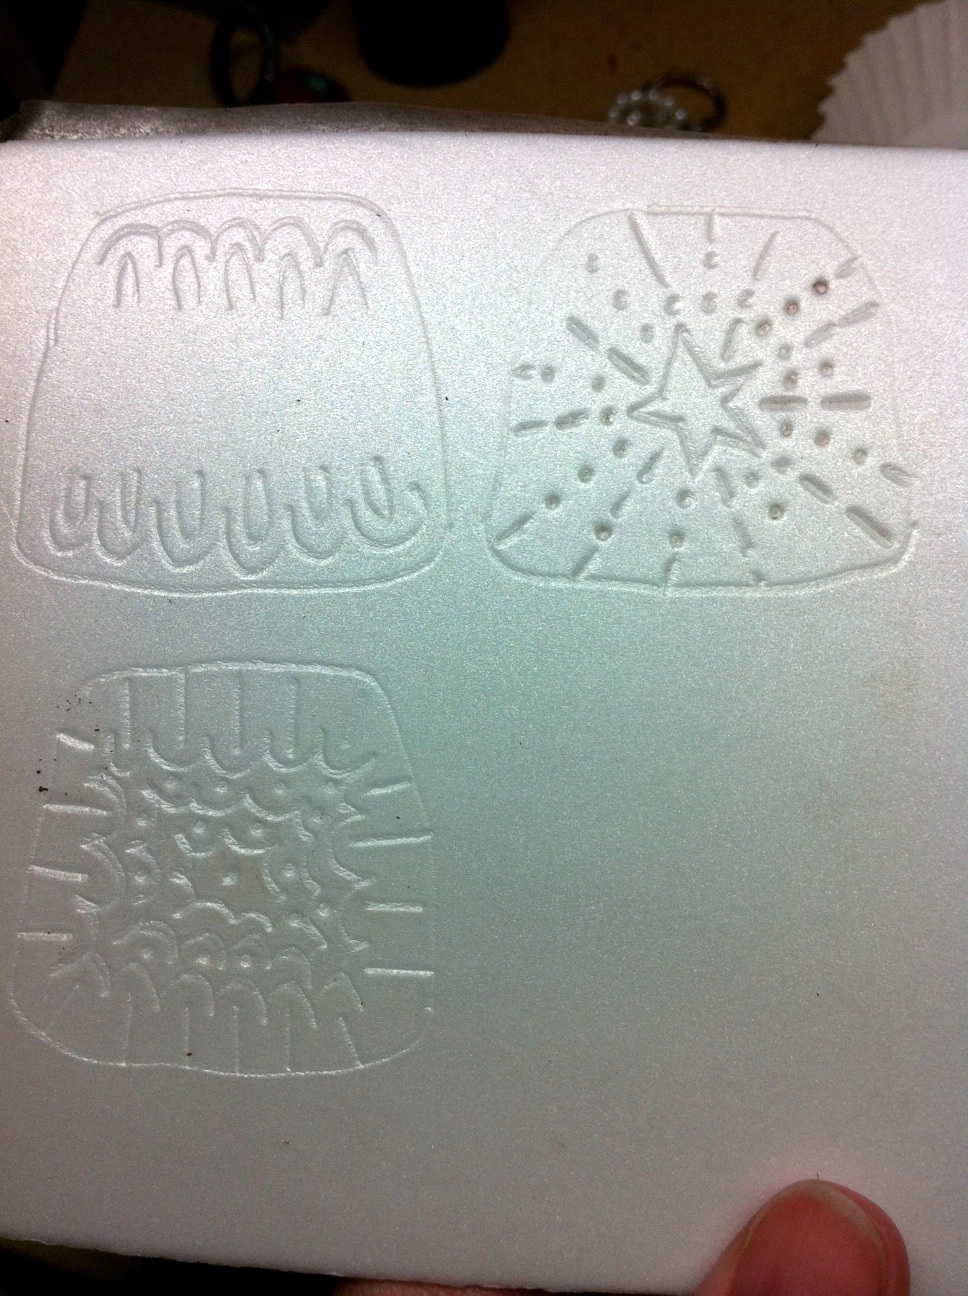
 In addition, she uses a great technique utilizing Scratchfoam, which is a very thin styrofoam. We used a small ball burnisher to create designs in the foam, and pressed the wet clay into it, creating a texture to the back of our pendants.


Here is a picture of the Silhouette Cameo cutting my bezel:

She rolls out a sheet of COPPRclay to one more than the lowest setting on a pasta machine (she rolls it within a heavy plastic bag lined with Cool Slip or olive oil to prevent sticking). Then she lets it dry and runs it through the machine dry (but not too dry- keep it in a baggy when it's initially dried or it'll get too brittle). You can see below my piece of bezel removed from the Press n' Seal wrap that it was stuck on to prevent it moving on the cutting mat. I also cut out some circles with a piece of brass tubing to use on my bail:


I chose a thick lapis stone and we enlarged it on the copier because the COPPRclay shrinks when fired. We then used this copy to create a polymer clay 'stone' to use to measure and form the bezel at the enlarged size.


We used PasteMaker solution to create a paste with the clay in order to join and attach the bezel to the backplate. We also made the bail and connecting u-shaped pieces. Everything was dried in order to connect using PasteMaker. Moisture Mist may also be used on the bezel to increase flexibility around the stone.


Above is an example of one of Wanaree's stacked bezels, fired and stone set.


Here are my pieces before being joined. I created a dangle using the pieces cut out from the bezel wire, too.


Here are the 3 pieces all connected with u-shaped pieces of dried clay and paste. It needs to totally dry before firing. A dehydrator was used to speed up drying.


 And here are pics of the finished piece:
No major failures during firing. Some cracking appeared in which we used another copper clay product, with a faster firing time, to correct. Some distortion and uneven shrinking occured, but nothing too major. Some students in the class had more problems after firing than others- it seemed pretty random! Wanaree didn't think my dangle would work, but we were both happy to see it fired well and stayed put!


And here is a pic of the back of my piece (still needs some clean-up!!) with my Scratchfoam design:


 I still have some clean-up to do on the piece, but I think it turned out pretty well. Can't wait to try out my very own Silhouette Cameo for etching glass with vinyl stick-ons, fun with paper, rolling mill experiments, and maybe cutting keum-boo pieces too! Stay tuned!