Tuesday, July 9, 2013

Update on Casting....


So today I called the caster I used to ask him about the issues with my castings. The powdery substance on the mold was parting powder. Which in most instances is not a problem, but with granulated surfaces, more powder is not good for definition. But the problem comes in removing the model from the mold and not tearing it- there has to be powder. And from what he said, that was probably the best mold material to use (non-shrink silicone). So, just part of the process.  But, I chatted with another caster from my Metalsmiths Unite II group on Facebook and he says that could be remedied by using a silicone spray instead of casting powder next time.

The orange-peel texture was from the freshly-casted pieces being put into the magnetic tumbler for a few minutes, with stainless steel pins/needles. It does a GREAT job cleaning out all the investment debris, but also leaves that texture. It also removes the gray casting skin. The caster said he can not do that in the future if I so wish. However, when I talked to my caster contact on FB, he doubted the texture was formed by this, or by the metal cooling, which the caster also said could cause the texture. He thinks it was caused by the mold having this texture, because if the mold-making is good, it can pick up fingerprints! So maybe the molding effort was the weak point in the company I used.

I am going to try another company or two, get estimates, and see what my best options are. I suppose every caster has elements in their production which are weak links. One jewelry friend said her caster didn't make the best waxes. 

Another thought is maybe I could eventually look into doing mold-making and waxes myself. It certainly would cut certain steps out of the process, save me money in the long run, and give me some control to the process. Time will tell.... in the meantime, I need to find a caster who is good and doesn't charge a lot, because the company I used was quite expensive. It makes it harder to create a lower-cost line of jewelry. Stay tuned.....

Monday, July 8, 2013

Castings Cleaned Up and Finished...

So excited to get my castings back (minus my favorite one!), today I spent time cleaning them and finishing them as I had envisioned.....


Here you see the original to the left, and the castings/copies to the right. They look from the untrained eye very much alike. The first thing I did was saw off the sprue from each casting.


Next, I fabricated the earwires and soldered them onto the back of each earring component. I also dipped them in an oxidizing/blackening agent.


I sanded the tops to create the contrast between the higher granulated areas and the flat areas.


I set the stones and folded the earwires- fini!


I like the look of them, and it took a lot less time to produce these than if I had hand-granulated them. This allows me to offer them at a lower price accordingly.


These were also casted- in order to make heart-shaped rings with a choice of different 7x5 stones, same size and shape as the stones in the earrings.


I followed the same steps and created a model which I photographed for my Etsy listing. The ring shank is not soldered on, to allow for a customer to tell me what size they'd like. I attached it to the heart component with museum putty. I also didn't set the stone yet- after the customer orders a ring and I finish and solder on the shank, I will set the stone and then mail it out.


Now you see where all these 7x5 opals are going!

Tomorrow I am calling the casting company to find out why the castings had an orange-peel texture, and also what the powdery residue was that was on them and was unfortunately molded. The company I used was also quite expensive; I may try another company recommended by a jewelry friend. More updates later.....!

Friday, July 5, 2013

Castings Have Come Back!

3 weeks ago I sent my items to the caster to be cast into multiples. And today they came back! So excited to see what's possible!

This is what the original or 'model' was cast in- non-shrink silicone. It's very flexible. My son liked smooshing it! The 2 halves fit together because of some unusual shaped ridges. I don't know how they did that!


Here's a closer view. I was impressed with how the mold was able to capture some of the under-cutting of the granules.


The original is on the left, the copies on the right. Pretty nice! They are unfinished, I still need to abrade/clean the surface and polish them. 


A sprue was soldered to the original model and then it was cleaned up, but my feeling was maybe not well-enough. I can see some residue still present in the original, that seems to have been casted in the copies. You can see that especially inside the bezel.


Another piece I had casted.


Again you can see some residue inside the bezel that was casted in the copies. Also, the surface of the castings has sort of an orange-peel texture.

I will be putting them in my tumbler with abrasive media in order to smooth out the surface. Then they'll be polished.


This one didn't make it through the sprue-soldering and ultrasonic cleaning operation- granules came off in the process. Dang- back to fusing! And it was my favorite one!


Tuesday, June 4, 2013

Memorial Etching

Last year, I wrote an article about etching for Art Jewelry Magazine. It covered a product currently being used for transferring designs onto nails with nail polish, but I used it for metal, since nail polish acts as a resist to acid. I got a lot of nice correspondence after the piece ran, from people asking questions to actually buying stones from my stone shop on etsy. 


One woman named Laurie who I corresponded with had questions. She was etching 18 gauge silver and folding them into cuff bracelets, so she didn't want to screw up. She wasn't using the nail plates but using PNP paper to transfer her image.  As it turned out, the reason this was important to her was because she was creating memorial bracelets for herself and a friend, both of which lost their sons, best friends, in a car accident. These bracelets were finished in time for the 1-year anniversary of their boys' passing.

I was really moved by what Laurie created. They are really powerful pieces, successful in layout, execution, and spirit. A great example of how art can heal.

Monday, May 27, 2013

Slabbing and Cabbing....

So this week I got some good things accomplished, including finishing up some cabs I'd had sitting in my studio for a while. I still have a handful left to finish, but feel good that the end is in sight... Take a look at my etsy store if you're interested in purchasing any- they're a large cabochon group this time:


Blue opal in feldspar, ruby in zoisite, ocean jasper, cheetah agate and imperial jasper.


I also got some slabbing done- this is my 10" monster slab saw from Harbor Freight. I bought the yellow garden cart from Lowe's to hold/transport it and I wheel it in and out of my storage room. The chair in back of it is to hold the bucket of water for pumping clean water on to the saw blade to keep it cool and to keep the rock from producing harmful dust.

It's pretty loud and messy- so using it outdoors is a requirement. My neighbors are probably glad when I'm done with a cutting session! 


Today I slabbed some rough pieces of bumblebee jasper, Washington state jade, ribbon turquoise, and Morgan Hill poppy jasper.


The Morgan Hill poppy jasper is some of my favorite. I am not usually keen on these colors, but for some reason the patterns and colors really appeal to me. Unfortunately, this stone comes with a lot of healed fractures, some of which can deter from the look of the finished cab, because it looks cracked. But if these slabs can make it through the slabbing process, they're stable enough to turn into cabs. You can see the fragments to the right that broke off along fracture lines while slabbing. When I receive pre-cut slabs, I often drop them from a foot above the concrete floor. Whatever doesn't break is usable for cabs.


This was from a huge chunk of ribbon turquoise. They will make interesting cabs!


This jade from Washington was very hard. I love the color- it's so soothing. And it has cool black inclusions.


I also did some slabbing for a friend of mine, Maureen, a former student, who went rock-hunting in California (Mohave Desert) and found what she thought/hoped/prayed was turquoise. I slabbed a bunch for her, and unfortunately for her, it's likely chrysocolla. Still a great find!


The ribboning is really cool, isn't it?


These slices are probably the bluest and prettiest. The contrast between the turquoise color and brown is really nice. They were nice and soft to slab, and will make some nice cabs.


Thursday, May 23, 2013

Mass Production & Wholesale

 Recently in a discussion group, the comment "Where are all the wholesalers?" came up. Stone wholesalers, that is.... Well, I don't really know if that exists much anymore. I think the goal as a jewelry-maker is to find a dealer who isn't so far removed from the mining of gems that the prices are astronomical. I have certainly bought slabs of rough from the guys who actually mine the rock. Then I turn them into finished cabochons and sell them for a profit. That's about the best situation, but not everyone can cut their own stones, and sometimes even I don't have the time and don't want to spend the time to do it. I have luckily found a few dealers from India who seem to have good prices on wholesale lots of finished stones.

In February, hubby and I shopped at the gem shows in Tucson. There, in the Electric Park show, were guys who actually slabbed the jade, mined the Mexican opals, etc... It truly was wholesaling and the prices were great. Back home, I can't hand-select stones. I have to trust the feedback others have given and cross my fingers that the gems I'm purchasing online will be as good as they look...


This is a parcel of small opal cabs, 5x7mm, that came today from India. Great price- but I had to buy a lot. If you have money to buy in bulk, it seems beneficial to do so...


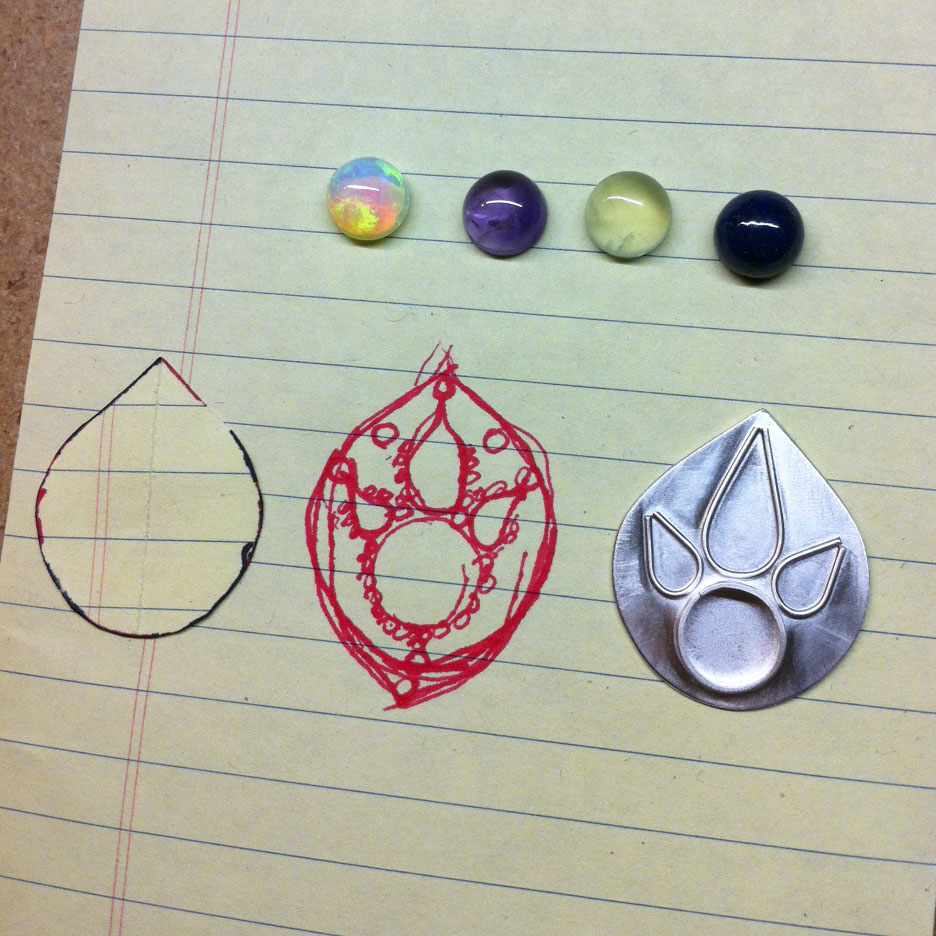
These are 8mm stones- lapis, prehnite, and amethyst. The reason I'm stocking up is because I, too, would like to get into wholesaling. I want to mass-produce items that typically are one-of-a-kind. Why? Well, I recently took a wax-casting class, and what I got out of it was, 'Why constantly re-invent the wheel by spending time making one-of-a-kinds? Why not take a nice design and replicate it a few times? Will a customer care if the item they buy from me is one-of-a-kind or one of 10 if the price is better?'


So, here's my first stab at it... I'm going to make a piece that will house any one of these 8mm stone cabochons, to become earrings. I sketched out a design, created a template, and have started producing the piece in silver as I normally do. The difference being, when I'm finished with the piece, but before I solder on the earwire, I'm going to have it molded and cast. Then, I will solder on the earwire and set the stone- whichever one the customer wants.

The learning curve will be to see how successfully it can be cast, and at what quality. I may produce a couple at first to be cast, to see what's possible, so I know what's achievable. But I'm excited at the prospect of developing a 'line' that is fast but still is a quality product. This will allow me to increase my inventory and start approaching stores/galleries to carry my items.

We'll see! I'll let you know how it turns out!!

Wednesday, May 15, 2013

Back to Work

From my last post you can see I am back in the stone-cutting business after finally purchasing a new trim saw after my last one died. It feels good to finally finish some stones that have been laying around for months and months....
You can see I used my ring saw again to trim up some rough slabs, as well as used my grinding wheel to clean up the shapes. You can see some jaspers, chrysacollas, agates...


After I grind the shapes, I like to bevel the bottom edge so it sits nicely and doesn't flake apart when being set. I also take the bottom and sides to a satin finish before I work on dopping the stones to work on the tops.


Here I set the stones in groups to be dopped according to size. Some are already done to the left. Only a few stones will fit on the dopping station at a time, and I have a cache of large stones to finish this go-around...


Here you can see some kambaba jasper, ruby in zoisite, imperial jasper, and porcelain jasper heating up, waiting to be dopped with the green wax on the end of a stick/dowel. If the stone is not hot, the wax will not stick.


And here are all 21 cooling after being dopped. Believe it or not, most of the work is done- now to finish the tops! Look for these new cabochons in my shop in the next few days: