Tuesday, May 14, 2013

Taurus Ring Saw is IN THE HOUSE!

So, Mother's Day was the day I devoted to trying out my new toy- the Taurus Ring Saw. Imagine a saw with a diamond blade, but the interior of the blade was cut out, leaving only the rim coated in diamond. That's how this saw works. And because it's got a smaller profile, it can cut curves. I tried it out on some stones that I'd mostly cut out on my slab saw- so they needed just a bit of trimming. Setup of the saw itself was very quick, and it needed about a gallon or so of water to make it work. It's easy to drain- I just remove the operable saw portion and dump the water from the tray below. I did have one mishap when the rubber belt came off the saw blade, but it was easy to fix. If that keeps happening, I'll have to look into tightening things up. The other thing that they recommend is to put ice packs into the water bath- I noticed that after about 10-15 minutes of use, the water was lukewarm. It helps with cooling the blade down.


Above you see the stones I needed trimming. It probably would've been easier to start with slabs, because trimming these stones was a bit problematic- the edges were very close to the exterior edge and that caused some problems, especially because I'm a newbie. It will take some work to get used to cutting with this blade. Practice will allow me to get to know how it cuts, how far from the marked edge I need to be, etc...


But all in all not too bad for my first time. A bit messy, but these should now be a lot easier to clean up on my grinding wheel. I was also able to grind edges using the saw, which is helpful. And the blade has 7 total blade-types available for purchase- including one that allows you to saw an interior section (it comes apart!) so I'm excited to get to know it better!


It also seems like a pretty safe saw, too- very little of the blade is visible, and I wore my safety goggles. I could definitely tell a difference in speed between softer and harder rocks- it is important not to push too hard!  The water splash also seemed pretty good- I'll have to try it again just to make sure I won't need to place a towel under the tray.

I think my new saw and I will be very happy together....

Thursday, May 9, 2013

Like Trades?

I LOVE trades. That said, I won't trade with just anybody- only those artists who have stuff I covet! This week I got to trade one of these pairs of earrings (the periwinkle ones) from Courtney Lipson for a ring of mine.


Here's her shop on etsy so you can check out her other stuff:


She's so talented and has also made AMAZING weavings... check out her website:


Here's some more of her earrings I covet:


She uses small seed beads to create mosaics and also uses multi-colored grout. She's an excellent craftsman, artist and person!

We were both happy with our trades!


Sunday, May 5, 2013

This Tuesday, something is coming.....


http://www.geminisaw.com/taurus3.html

And I CAN'T WAIT!! My lapidary trim saw bit the dust months ago and I've been either going without, or using my slab saw, which is way too big and powerful to cut out shapes from slabs (I've had some breakage). So the truth is I haven't cut many new things in the last few months. But come Tuesday, I will be furiously cutting stones! So excited!

Ann Robinson told me about this machine- she got one and it replaced her trim saw. I met Ann when I took a class at her home/studio near me in Springfield, Virginia. Here is a link to her site:

http://www.laruchedavis.com/

I also saw a demonstration of this saw in Tucson this year. My biggest concerns are 1) water splash and 2) effectiveness with harder stone.

And with the money I made at my recent Ladysmiths show, I figured the time was right...

Because I'd like to use my trimsaw indoors, I'd like the water splash to be minimal. Ann says it's wonderful; not a problem. So we'll see. As it is, I have to park my large slab saw inside and wheel it out in a garden cart when I need to use it- it's incredibly watery when in use. Water flying everywhere. I get wet, everything gets wet. Which I guess is a good problem to have, since dry-sawing rock is not good....

But in Tuscon I saw that it does take longer to saw thru harder stone. So we'll see... I'm also concerned about blade breakage because those bad boys are $75 a piece!!

So, come Tuesday, I'll be ready to give a report!!!

CAN'T WAIT!!!

Wednesday, May 1, 2013

Montana Agate Necklace

This below piece wasn't made by me, but by Betsy Bensen. She bought the stone from me, though, and I have to say, it's really a thrill to see a fellow jewelry artist use one of my cut stones! And what a neat solution! It was a thin slab and I love how Betsy set it.


Here's a link so you can see more pics:

http://www.etsy.com/listing/130892668/montana-agate-sterling-silver-pendant?ref=pr_faveshops


Monday, April 22, 2013

Twisting Wire Shanks

 Today I made a ring with a shank made from twisted wire. I've really been into twisted shanks lately, and this one was a new variety I tried- it looks braided, but it's not....

It's actually 2 bundles of twisted wires.


I LOVE the texture, simplicity and graphic quality of these shanks.


And it really dresses up what could be a plain band.


Normally I like to oxidize them in order to bring out the contrast, but even without oxidation they're lovely.


The twist wire on this band was commercial/purchased- one that came stamped with the pattern. It's the same wire as the perimeter of the ring.  I like making my own because I am not limited to a certain size.  And I love a chunky band, so I usually use 16 ga. wire.


This is also a twist wire- but a single wire that was originally square. I also love this look but it can be challenging to twist a chunkier square section of wire. So worth it though!

Want to know how to make a twisted bundled-wire shank? I used 3 strands of 16 ga. wire. 14 ga. would've produced a thicker, larger shank, but I think too big and perhaps a bit hard to work with. 18 is nice but a bit too thin for me. 16 ga. is my fave. 3 strands is much more attractive and produces a more even result than 2 strands, trust me. Don't scrimp. 


First, guesstimate how thick your final band will be- my final band was about 12 gauge, so I used that measure to determine how long a section I needed of wires. Then, I added a minimum of 2 centimeters to the desired finish length- more is better but in the interest of reducing waste of silver, a minimum of 2 extra cm is workable. 

To twist wires, you can use a hand-tool specially formulated for twisting wire, or a drill. But the drill can twist too fast. My solution is this:

It was specificaly designed for wire-twisters, and wasn't too expensive from wire-sculpture.com. The secret is that it spins at a very slow speed, so unlike a drill, you can slowly twist and control the tightness of the twist. You enter the 3 ends into the chuck and tighten, then use pliers on the other free end of the wires and hold firmly, then push the trigger to twist!

You can experiment with how tight a twist you like.


The best feature of the wire twister is that you are able to switch the direction of the twist. That's critical to making the above shank. One is twisted one way, one the other way. They were then cut the same length and joined end-to-end. Finally, they are stacked on top of each other and because they're Argentium silver, they were heated and fused together. This process would be a lot harder and messier to do with sterling and solder. A LOT HARDER. 

The result is the look of a braid. It's a good substantial shank, about 1/4 of an ounce of silver. And it creates a look of an expensive band! Once the shank was fused I did hammer it a bit on the mandrel, but that's an aesthetic choice. 

It takes some time, but I love the look and the fact that's it's handmade.


Friday, April 19, 2013

The Trouble with Dana

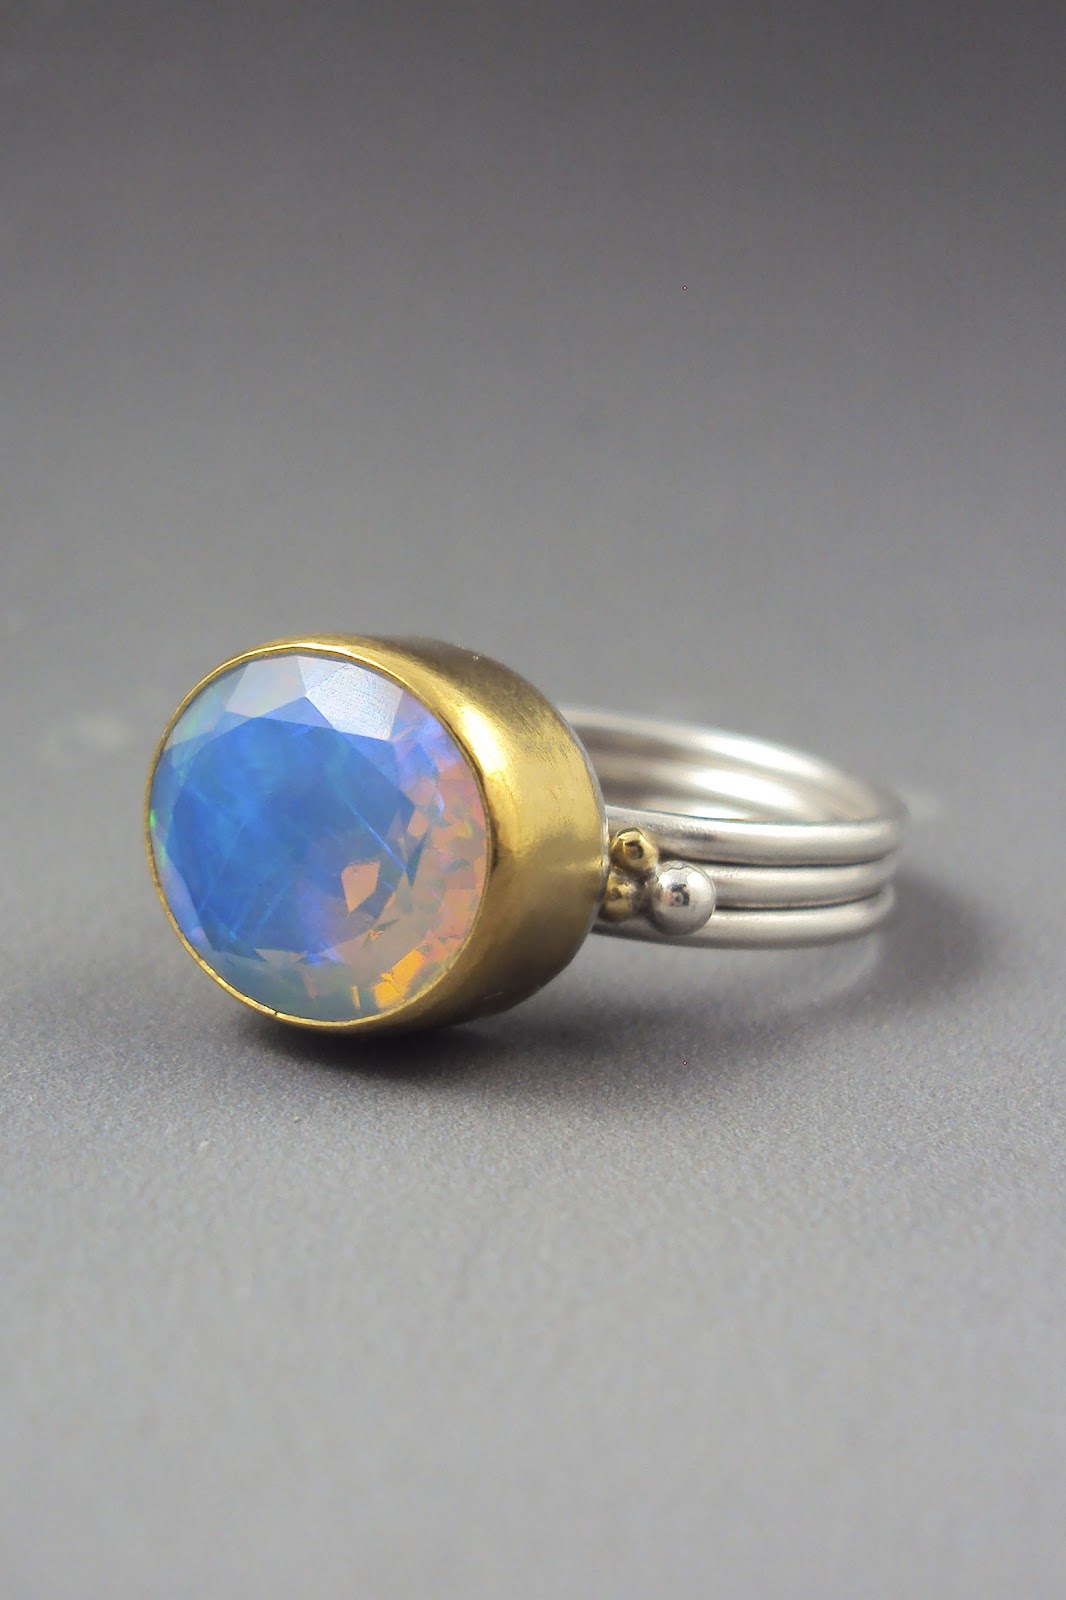
 Aren't these stones gorgeous? They are faceted Ethiopian opals. 

I got them recently because my mother-in-law Gerry wants a ring made and it's gotta be an Ethiopian opal with as much fire as possible! She wants it in gold, too.


So, I wanted to make one using a gold bezel because I'd only ever made one piece with a gold bezel before, and it was 14k and I hated it- 14k is so hard, which is good for longevity, but not fun to work with. 


So I used 22k, which is similar in hardness to sterling silver. I really took my time. I didn't want to screw up with gold. Things went well. I wound up cutting a hole in the bottom of the setting for the point of the stone to sit in, but then soldered another smaller piece underneath because I wanted to totally enclose the stone in the bezel/backing and not have any transparency- so I could blacken the inside completely and hence try to have the fire in the stone accentuated. 


I generally like transparent stones like this with a big hole in the back to see through, because of the fact that they are transparent. But another jeweler recently advised me to enclose and blacken the background, so I gave it a try. Plus, it made the shank design easier. I'm still on the fence about if I like it enclosed or see-thru. I sort of felt like it was a short cut to solder that piece of backing on. What I should've done was create a piece of bezel that was taller so I didn't have to do that, but I was using commercially-made bezel and didn't want to take the time to forge a taller piece. Argghhh.....


I then went to work on the shank, fusing 3 rings of 16 ga. Argentium wire. I really wanted to fuse a few gold balls onto the shank near the position you see them in, but they just wouldn't stay put. I probably could've used a product to make them stick; I'm not sure. I didn't take the time to look into it.


So what I did instead was fuse the 3 ball clusters you see on the ring first, using the 22k gold and Argentium. Then I carefully positioned the clusters on the band (took a WHILE because they would not stay!) and fused them on.


And what did I discover when I finished? Well, from the below shot you can see it clearly- the ball cluster on one side fused on crookedly. So what I did: kept going. What I should've done: re-made the band.


I finished the ring and was instantly deflated because the crookedness is just not something I'm proud of or should've allowed. And this is why this post is called the trouble with Dana- because Dana rushes to get things made. 

This is not a good quality.

I have a show next weekend, the only one I do all year. And I'm feeling the pressure to produce. And that's when I do stupid things! It all started when I first joined Etsy. I sold a ring after just 2 days. And then a week later another item. I was hooked! I LOVED the fact that someone was willing to spend their hard-earned money on something I made. It's like an addiction, a high. The making of something and having it be done also produces a high. And on Etsy, there is a lot of pressure to produce something new. There is constant "What do you have that's new" and I'll admit I am guilty of producing some work I'm not proud of because of that sense of urgency. It's not good.

This is something I continue to struggle with. My finishing skills are lacking because I'm usually trying to 'get to the finish line'. 

I need to try to do better.

So now, I'm struggling with spending even more time correcting the ring by sawing the offensive ball cluster off and re-attaching it with low-temp solder, leaving it as is and putting it up for sale, or keeping it.

Motto for Dana: slow down & do it right the first time!!!

(P.S. the bezel did turn out really well, though!)

Friday, April 12, 2013

Opal Myths

I've always always always loved opals. They contain every color in the rainbow. And I've always loved color. I'm not a big diamond person- I'd much rather have an opal than a diamond. But many people are just the opposite. And they blame opals for 'bad luck'. How can that be? Opals have brought me nothing but beauty and happiness. So I wanted to examine why opals have gotten a bad rap in recent years.

In the mid-1800's author Sir Walter Scott wrote a book called 'Anne of Geierstein'. The main character wore an opal which changed color depending on her mood. The opal even was seen to exert evil influence over the main character. It's no wonder people were spooked!


And let us not forget the poor diamond trade. Around the same time Scott's book came out, diamond merchants saw an opportunity to cash in on the book's negative image of the opal by continuing the propaganda that opal is not a lucky gem. This of course was because they wanted a larger market share of jewelry sales. Opals had been a very popular gem up until this time in history, and in fact had been associated with good luck across many cultures, often being used in engagement rings.

In fact, Queen Victoria was a lover of opals. She actually supported the miners who came to London hawking their Australian opals. People had never seen Australian opals before and didn't think they were natural, as they were used to milky and less-firey European stones. She supported the Australian miners and not only wore opals but gave them to her daughters for their wedding presents.

Some cultures mistook the opal's beauty as sorcery, and connected evilness to it. But the large majority of cultures have loved and appreciated the opal throughout history.

Also, the opal's fragility has been given a bad rap. Opals are not as hard a stone as emeralds, rubies, or diamonds, but are also not as fragile as generally thought. They are comparable to glass. And the thicker the stone, the more robust it is. Often times an opal will crack because it is prong-set, which exerts uneven pressure on the stone. Bezel-setting opals is best. 

And the myth of soaking an opal in water to keep it from cracking is simply not true. The water in an opal is contained within it's cell structure. The stone is non-porous and will not absorb any water. Same idea with oil- it will only make your stone oily but will not prolong the life of the stone or prevent cracking. Opals are stable stones and will only crack with pressure from bad settings, or extreme heat/cold.  In fact, immersing an Ethiopian opal in water will temporarily hide the fire. 

How could you not love an opal??