Saturday, July 21, 2012

Granulated Earrings, Part 2: Completion

A few weeks ago I posted about some earrings I was starting that were to have granulation. Well today I finally had a chance to finish them! (Check back on the earlier post to bring yourself up to date:


After a bit of trial & error. I decided on my layout for the Argentium silver granules. I fluxed them and allowed them to completely dry.


Ronda Coryell has recommended that one use half flux/half water to flux the piece- if you use 'straight' flux, it bubbles and foams too much and will displace the granules.


You can see at this point that the silver has started to liquefy on the surface- it's shiny and the flux residue (small droplets) is starting to 'dance' around- and this is at the point of fusion. Argentium silver has the advantage of having a larger window of time/opportunity for items to fuse before meltdown occurs. It almost turns to gel. You also have to wait until it's no longer red-hot before quenching, or the silver will be overly shocked and will crack. 


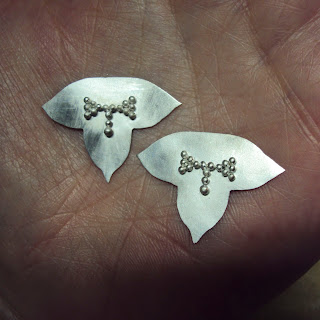
Here are the pieces after fusing. I went over them with my pink (pumice) 3M disc and they are ready for the next step.


I decided to use solder to attach the balls to the 3 corners- I was afraid that there wouldn't be enough surface area of fused material to hold them on for the long haul. A little messier, but it's a tough thing to attach such a small granule to essentially a point in the silver. Now they are ready for the bezels to be soldered on- you can see the tiny snippet of solder inside each bezel. When heated, they will melt and flow underneath the ring of bezel wire. I am careful to position them at the far end of the bezel from the granules, for I don't want any solder to enter the granulated area.


Here they are after soldering and pickling. I cut out a hole for the back of the opals, but since the rubies are being set upside down, they can be set as-is in the bezel. Next I go over them with the pink pumice wheel (which is a pre-polishing disc).


Here they are - I drilled holes for the earwires, and oxidized them in Griffith's Silver Black, then rubbed them with a polishing cloth to bring out the shine in the granules and create contrast. I also created the earwires, which will be attached, and bent over to form the portion that goes through the ear.


And here's the finished product! To me, a piece isn't done until it's photographed and listed in my Etsy shop. Then the work is done and I can move on to my next project....

Wednesday, July 18, 2012

Sketching for Myself & for a Client

Recently the subject came up about sketching; another jewelry artist asked in a forum whether any jewelry artists out there value drawing. It's a great subject. Some of us can draw, some of us can't. I have a background in the applied arts, having an architecture background -but before that studio art and art history were my subjects of study. So I can't help but draw. Drawing helps me think and work out problems. I can't imagine being able to design without the tool of a pen or pencil. But some artists have a general idea and then plan as they go. I work better if I have a specific plan.

Although I do sketch for myself first, if I'm doing custom work, I work more detail into my sketches- primarily color.

Below are some sketches for a client who sent me 3 pairs of stones and wanted me to make earrings for her. I did many designs, but then settled on the below ideas (2 ideas for the 3rd pair). I had many sketches of each, but once I pared them down to what 'felt right' to me, I drew a nicer version of my sketches for her, added color (colored pencil) and notes, and sent them off for her approval.

The above sketches were cut out from my sketches and grouped together for my client. She decided on the bottom right pair of earrings (but with the yellow stone) for the 3rd set. And below you can see how they turned out:


What's important to show to a client is a good representation of the stone(s) showing color, design, proportion, and some sense of depth and character. I want the final piece to look very similar to the sketch. I want the client to be surprised- but in a good way!! 


Even though I have sketches that I closely follow, I also allow some changes based on the natural flow of creating a piece. I showed the bottom pieces star-shaped in the sketch, but when it came to fabrication, I had some different ideas, and I think it still kept with the character of the sketch.


These were originally planned as post earrings but my client decided she preferred the hanging lever backs, so luckily it was easy to encorporate into the design.


When I'm sketching for myself, I'm a lot messier!! It may look like these sketches repeat themselves unnecessarily, but in actuality I was working out the details by creating lots of options. This was a design for a piece utilizing nail stamp etching, a technique I wrote about in the May 2012 issue of Art Jewelry Magazine. It actually became a pendant:


You can see how the final product differed than the sketch a bit- the accent ball locations. Sometimes it's nice to go step by step, and then try some different options out as you go. 


These sketches were for a piece I wanted to try some keum-boo on- which is a thin layer of gold fused to the surface. I started with some elements I knew I wanted to use- some small opals and open space for the gold patterning- and kept going until I found some design that resonated with me. I am a very intuitive designer, even though I have a design background. It's gotta feel right! You can see the finished earrings below based on the sketches above on the bottom right:


Once I had the final idea for the earrings, I actually used my ellipse template to cut out my shapes from the silver sheet. That way I just had to trace the sized-ellipse I wanted (that worked well in proportion to the small opals I had) and the 2 could be cut exactly the same. I usually use my plastic templates for shape-making, or I use my sketch to make a paper pattern, or I actually draw up the piece on the computer (Adobe Illustrator) to print out a template.


This was a sketch I did for a client who wanted to have a pendant made with red coral beads she supplied to me. She chose a couple of opals from my stash and gave me a rough sketch of a triangle with a foldover bail. I turned the triangle upside down, because I felt it would work better with the bead strand, and added the details.


Showing the sketch with the stones pictured on top is also a great way to show the client the character of the finished piece. This is the pic I sent for her approval. 

After the sketch was approved, I went ahead and carefully measured and drew the stones and then the design on the computer. This gave me a chance to play with the curvature of the triangle to achieve a more workable shape.


If I don't use a computer-generated template, then I will hold onto any paper template I make- because you never know when you may want to use them again!! Having them on the computer means I can print them anytime I want. I may even scan my paper templates sometime so I don't have to hold onto on these pieces.


And this was the final pendant for my client, who was very happy with it. The best feeling and compliment is when a client is happier with the picture of the finished piece than the sketch, and even happier with the piece in person!


This was another pair of earrings designed for a client based on multiple sketches.  Sometimes the smallest changes in shape or proportion can make a big difference.


This was a second sheet of sketches- she decided she liked the central pair the best out of all the sketches. You can see how coloring and shading the sketches really makes the pieces come to life.


And here are the final pair. I did do a measured drawing on the computer first, printed it out onto sticker paper from the office supply store, then placed that on my silver sheet to cut out pieces that were exact and exactly alike. I can also make small changes in proportion while on the computer which saves me time when I'm fine-tuning a design. When using a paper template, I simply trace it with a Sharpie pen.


Sunday, July 15, 2012

'Suites' of Jewelry

Well, it's summertime, and for me that means- low production. My 3 kids are off of school, and they like their mommy available at all times. Camp, pool, playdates and movies pretty much fill my days now. Oh, how I long to get downstairs to play!! Soon enough it will be September and things will be back as they should.

So, in the meantime, I get a smidgen of time on the weekends when my husband is home, and lots of time to plan! Having a break from production has it's benefits. It lets me think about how things went this year and how I can make improvements.

One thing I did in the last year or so was to re-photograph my current inventory of pieces into 'suites'. My intention was to group pieces together that seemed to 'go' together in order to try to persuade buyers to buy more than one piece.

The thing is, if you make jewelry, especially one-of-a-kind pieces, by grouping them together it sort of shows it's own logic- like you intended certain pieces to match or coordinate. Depending on how many pieces are grouped together, it can illustrate different 'lines' within your jewelry oeuvre. One additional benefit is it shows relative scale of pieces. And, it just plain looks good to have a grouping of jewelry- it makes it look like you are a 'full-serve' shop. 

This was an experiment that bears repeating. In addition to listing the suite photos in with the individual pieces of jewelry (so customers could see what pieces would go with the listed piece), I also listed each collection separately- such that if someone wanted to buy all pieces shown in the photo, they received a small discount. I can't say it fulfilled my goal of selling multiple items, because not one customer bought more than one piece, but it did increase sales!! In fact, within a short time, I had to remove every one of my discounted suite listings, because at least one item in each had been bought individually. Yes!!!

If you sell jewelry and want a tool to improve sales, you might want to try it!! Here's a look at the photo suites I photographed and listed:


Opal Suite


 Relic Suite


 Purple Suite


 White Opal Suite


 Encrusted Suite


 Purple Opal Suite


 Yellow Suite


Turquoise Suite

Friday, July 6, 2012

Opal Types

This week I bought an opal on Ebay- I like to troll the vintage category because sometimes I can score a really nice piece for very little money. It was a little hard to identify, though- and it got me thinking that it'd be fun to write a post about all the different types of opal out there right now. 

I'm no scientist, but opal is opal because of it's physical properties-  hydrous silicon dioxide (or simply- silica).  It is not a crystalline form- it's amorphous. It is found in 2 basic location types- in sedimentary deposits (as in Australia) or volcanic deposits (as in Mexico). It has anywhere from 5% to 10% of water in its composition. In precious opal, the spheres of silica are arranged in an orderly fashion, and when light hits them, a prism effect occurs and produces the gorgeous play of color opal is known for. 

Common Opal

Above are a couple of cabs of blue Peruvian opal. This opal does not have any play of color that opal is famed for, but because of it's lovely blue color, it is still a desirable stone. It's actually the national stone of Peru, and unfortunately lots of imitation/dyed stones have reached the marketplace to take their share of the pie. The prices for Peruvian blue opal have really taken off. Here's an article about how to spot 'fake' Peruvian blue opal:


The same can be said for Peruvian pink opal- very attractive color- but no play of color. Common opal comes in many more colors- yellow, green, purple and more....


This fire opal from Mexico has a distinctive orange color and although rarely has play of color, is prized for it's color (which can range from yellow to red) and it's translucence. Here's a nice article about Mexican fire opal:


Precious Opal

The opal cabochons above have a white color base and a play of color. These cabs are from Cooper Pedy in Australia. Like other stones, opals are often named for the area in which they are mined. Here is a map and description of the major opal fields in Australia:


This is another example of Cooper Pedy. Sometimes, the base is white, sometimes it's translucent, and sometimes a combination of both. This stone has a base of softer sandstone. Much of the opal found in Australia has a similar base. In ancient times, Australia was underwater. Many shells and sea creatures have been replaced over time with fossilized opal. Mining for opal in Australia is hot, dusty, and hard work. Deep dark caves have to be dug in order to find a small amount of precious stone. Here is a cool video that will give you a snippet of what it's like to mine for opal:


The example above on the left is an example of crystal opal- where the base color is transparent. This is my favorite type of opal- it looks like clear water with fire inside! The stone on the right is semi-translucent and has amazing fire.


Sometimes, the base color of an opal is dark- or black. These are examples of black opal. These are highly-prized because the dark color really shows off the stones' play of color.


In addition, like the above stones, sometimes a thin slice of precious opal is glued to a dark backer stone in order to look like a more solid stone. It also brings out the fire in the thin slice. These are known as doublets or triplets. Here's a description of them:


These Australian stones are referred to as boulder opals (or Koroit or Yowah). The precious opal in these stones is intermixed within the base ironstone rock, and is not a solid piece of stone. These have their own picturesque beauty, however, and are also highly sought-after. 


These are also precious opals, but they are found in Mexico, and have fire within a pocket of host rock. They can tend to have the signature Mexican fire opal color- yellow, orange, pink, red and clear- but they also have a play of color which makes them precious. They also tend to craze quite a bit. Here's an interesting synapsis on the types of Mexican opal:


The stone on the right is a piece of Australian Andamooka matrix opal. This is so-named for the area in Australia it is found. It is a light colored  limestone, that's been treated and turned dark, in order to bring out the exciting pin-point fire in the stone. The Fairy opal on the left is a similar matrix opal, but it's sandstone base is quite soft, so after it's been darkened, it's typically hardened as well.

Honduras is another location for fine matrix opal. These stones are 'sugared'  in a heated solution, and then 'carbonized' to turn the sugar black. It's a lengthy process. The Fairy opal is not as prized as the Andamooka or Honduras matrix opal. Here's a great link to how matrix opal forms and is treated:


These are carvings made from Australian opal.


A relatively new source of firey opals is the Welo area of Ethiopia. The stones have amazing fire and have been the latest 'big thing' for opal collectors. Many of the stones are faceted. Some Ethiopian opal is dark/chocolate brown with fire.


Here's an Ethiopian opal I cut myself. The Ethiopian opal differs from Australian opal a bit. Whereas the Australian opals do not change much in water, these Ethiopian opals may become opaque when wet. When they've dried out, they return to their original state.  They are more able to absorb and evaporate water from their pores.

All types of opal are a bit soft- like glass. Okay if dropped on a carpeted floor, but probably not on a hard surface. Be careful! Also, the worst thing you can do for opals is keep them in a safety deposit box- too dry! Wear them instead! Keep oils and dirt off of them- that could be absorbed and affect the play of color. No need to keep them in water- just wear them regularly and enjoy them!


Imitation Opal


Because opal is so sought-after, there's a market for imitations that look convincingly real. Above are opal beads that are man-made, created, or 'lab' opal. They have a variety of base colors, and have nice play of color. Sometimes it's hard to tell real from fake, but lab opal often has too regular a pattern to be real, and has a directionality to the fire. Their make-up is chemically just like their stone counterparts. Here's a bit more information about them:


These 'opal' beads are commonly referred to as 'opalite'. They have no play of color, are very inexpensive, and have the milky quality of crystal or transclucent opal. Here's a nice short article about them:


That's a good primer on opals! The Queen of Gems!


Sunday, July 1, 2012

Roughing Out A Slab of Stone...

In this post I want to show you how I rough out a slab of stone into smaller units in order to form into cabochons. 

Above are various templates. Some I had leftover from my architecture days, and some I got recently. With the invention of metal clay, there opens up a new market for templates, but I like to use them for stones. I also use them for enameling- you can use them to sift a design onto your piece for firing. I also use them for designing pieces in silver- like deciding on how big a circle I want my earrings in silver. They're helpful in SO many ways. Cooltools.us makes a bunch of excellent templates, as well as Isomars.com


Above is a slab of rhodonite that I traced out a circle on with a Sharpie permanent marker. It's nice to be able to move the template around to find a particularly beautiful section of stone. This round circle will be cut out and further cut and polished to become a cabochon.


In addition to pre-made templates, I've also had several of my own made. I found a vendor who does laser cutting, and he cut 3 sheets of shapes that I had designed in Adobe Illustrator and sent to him. I really like the clear sheets, too, because I am able to better see the slab through the template and can better decide which part of the stone I want to cut out. Many lapidaries like to freeform their stone shapes, but I find having pre-set shapes better for me. Because I have a flat lap and not a Genie-type rock polisher, I can't cut stones that have concave shapes- only convex. So, until I upgrade to a Genie, I'm a little limited in my free-form shapes.


For example, above is a slab of Sonoran Sunrise. Using my clear templates, I am able to decide where the best part of the stone is to make an exciting and picturesque cabochon from.


Here is another example using snowflake obsidian. Some lapidaries prefer to use a metal scribe to mark their stone shapes rather than a permanent marker, and this is especially handy when marking up dark stones.


Another important consideration is yield. Yield is simply the amount of stones that you can create from the piece of rough. The best yield uses the most amount of the stone and produces the least amount of waste. 

Yield also is dependent on slicing the stone. The darker lines in the above picture (of agatized dinosaur bone) show where I will be slicing the stone into parts. The NE-SW line is along a fracture. The line crossing it shows the other line I will saw through. I have to allow for any crumbling that occurs with sawing, as well as the room the sawblade takes to grind through the rock. I could have marked out more lines, in order to up my yield to 6 or more stones, but the unattractive dark spot in the center dictated where I placed the current sawline. Sometimes it's better to create fewer stones that are more attractive, than more stones that are just okay. It's a balancing act. I can now look at a slab and in my mind calculate where I want to locate my cabs based on where I need to slice the slab up. Due to the curve of the sawblade, it's not practical to cut halfway through the slab and then back out- it leaves slanted and wasted parts of the rock and I prefer to just cut all the way through.

When cutting stone, one does not use a traditional sharp blade- one uses a diamond blade with a water drip. This is because using a wood-type blade will merely crack the stone. A diamond blade is not really cutting as much as grinding a path through the rock, until it's separated in two pieces. It's a fairly safe saw to use, in terms of injuring yourself by the blade. The injuries come from flying rock debris. 

There are 2 types of saws typically used by lapidaries- a slab saw, and a trim saw. The slab saw I have is pictured below (courtesy of Harbor Freight):


It is a 'wet' saw which means it has a pump which shoots water onto the saw. Rocks have a lot of dust so the water controls that, as well as cooling the blade and the rock. This saw has a 10" diameter saw blade, which means it can cut approximately a 4"+ nodule of rough rock. I use it to cut slabs from rough rocks I buy. Here is a link:
Once the rock has been slabbed, typically a trim saw is used for cutting the shapes from the slabs. This typically has a 6" diameter blade. I'm currently in the market for a new trim saw, so I've been using my slab saw for all slicing! Bad girl! After I cut my preliminary sections, I then go back and try to cut any extra pieces of rock until I get close to the desired shape. The reason for this is because that way, there is less grinding to do later on my flat lap machine. Here are a couple of rocks that have just been trimmed up with my saw:

In order to get as close as possible to the outline of my cabochon shape, I actually use my blade to grind the edges by holding my stone and running it back and forth along the blade to essentially file off the edges and get the shape as close to the marker as possible. I got this idea from this online tip:


Here's a couple of pieces of ocean jasper:

The downside to using my very powerful slabbing saw as a trim saw is that sometimes there's just too much force. In the piece on the left, just trimming the shape resulted in a break along a weak part of the stone. I should have known better, because ocean jasper can be a bit brittle if hit at the wrong point. The second piece was damaged when I tried to 'file' the edges. Don't worry- both are salvageable!


Here's another look at my flat lap. I like the flat lap because I can get a very flat surface, which I would think would be more difficult with a Genie, which utilizes wheels anchored on their sides. But what do I know? Never used one! You can see from above that the post has a threaded area- this is to hold the disk onto the spinning axle- you can see the screw to the right of the picture. The white cup holds water and drips onto the spinning disk to cool the stone and prevent rock dust.
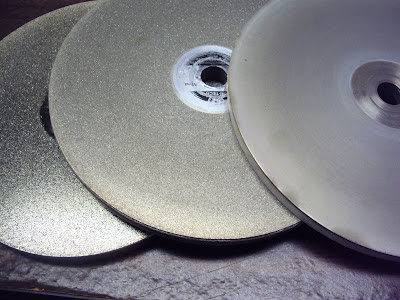


These are the diamond discs I use to grind stone- they are, from left to right, 100 grit, 180 grit, and 1200 grit. The 100 is new- haven't tried it yet. The 180 was getting worn and was not cutting as fast anymore. The lower the grit number, the larger the diamond particles and the more aggressive the cut. I use these in order. For softer stones, I start with a gentler grit and don't use the more aggressive ones. After using the 1200 wheel, the stone takes on a matte finish and is no longer frosty-looking when dry.


These are the next discs I use- sanding discs. They are diamond, but embedded in resin and they are not as aggressive as the metal diamond plates above them. The red disc is 600 grit, and the blue disc is 1200 grit. It may seem like I'm going backward- since I go from a 1200 grit metal diamond disc to a 600 grit sanding diamond disc, but because they are less aggressive, the numbers aren't really comparable. The white disc is a Trizact cerium oxide polishing disc.

I will go into more detail about each disc in another post!!


Here are some Sonoran Sunrise cabs that are ready for grinding into better shape.


And here is a stash of stones fresh off the slabbing saw that are ready for the next step. But that's another post....


The stone above has been cut out from it's slab, and the edges have been ground using the diamond discs, and then the red sanding disc. The back has also been finished up to the red sanding disc. This is typically the most I will polish the sides and back of a stone. This treatment leaves a nice low-sheen on the stone. I also slightly bevel the bottom edge of the stone. At this point, I will dop the stone- which means I use hot wax to attach a wood 'handle' to the stone to make it easier to hold. And then it's on to grinding and polishing the top- the exciting part!!

So you can see how much work goes into preparing a stone just to be dopped. I will show you the process of dopping in another post.  I'll also post on how I go about grinding and polishing the tops of my stones. Stay tuned!!